1.Overview
This is a general guide to setting up a functional Nextcloud instance using Ubuntu Server 18.04.3, Docker CE, Docker-Compose, Collabora CODE, and an Apache reverse proxy. By the end (and as of writing), this setup will have an A+ rating on Nextcloud Security Scan and Qualys SSL Server Test and a valid, self-updating certificate from Let’s Encrypt. I will also cover how to update everything.
I will do my best to plainly emphasize things that you will need to change, but it will mainly be three things: FQDNs, IP addresses, and passwords.
I know a lot of people are trying to get on board with Nextcloud right now during this COVID-19 pandemic with so many struggling to work from home. I’ve installed several small Nextcloud instances using this method with good results, and I wanted to compile my setup notes in a format that’s easy to follow and reproduce. So here we go.
2. Things To Have Ready
You’ll need to have some info ready that we’ll use throughout the process. Most of this will be outside the scope of this document. You’ll need:
• Fully Qualified Domain Name (FQDN) for Nextcloud
• FQDN for Collabora
• Access to your local and public DNS records
• Freshly-installed and up-to-date Ubuntu 18.04 server
In the below examples, I’ve used cloud.domain.name for Nextcloud’s FQDN, and office.domain.name for Collabora’s. Replace these with yours.
Although I won’t go into great detail here, I also want to briefly explain the concept of split-horizon DNS since a lot of people who aren’t network admins aren’t familiar with it. What this means is that you have a DNS zone, in this example domain.name, and that you have this zone available in both public DNS and local DNS where the records differ.
So for example, when you are off-network, your device will query cloud.domain.name from a public DNS server and receive your external IP address. When you are on your LAN, your local DNS server responds to the same query with the local IP address of your Nextcloud server. The end result is that, no matter where you are, your device can find your Nextcloud server without doing something silly like hairpin routing through your firewall to come back to it.
3.Install Docker CE And Docker-Compose
The first thing we’ll do is set up Docker. Install Docker and Docker-Compose as outlined here:
I recommend going through the official setup instructions, but here is the short version:
sudo apt install apt-transport-https ca-certificates curl gnupg-agent software-properties-common

curl -fsSL https://download.docker.com/linux/ubuntu/gpg | sudo apt-key add -

sudo add-apt-repository "deb [arch=amd64] https://download.docker.com/linux/ubuntu bionic stable"

sudo apt -y install docker-ce

sudo usermod -aG docker ${USER}

sudo curl -L "https://github.com/docker/compose/releases/download/1.25.4/docker-compose-$(uname -s)-$(uname -m)" -o /usr/local/bin/docker-compose

sudo chmod +x /usr/local/bin/docker-compose
4.Install Apache
4.1.Apache Reverse Proxy Overview
A quick note about Apache. We will be dealing with multiple instances of Apache in this setup. We will be installing Apache on the server, and this will be our reverse proxy. The Nextcloud container includes its own Apache instance which will actually be running Nextcloud. Unless I explicitly say otherwise, when I refer to Apache, I’m talking about the reverse proxy running on the host having nothing to do with Docker or any of its containers.
Basically what’s going to happen here is this Apache instance will receive web requests for both Nextcloud and Collabora and forward them back to the correct Docker containers. Nextcloud and Collabora will also talk to each other through this proxy. And finally, this Apache instance will also handle all of our encryption.
Install Apache from the Ubuntu repository and enable some modules.
sudo apt install apache2

sudo a2enmod ssl proxy proxy_http proxy_wstunnel rewrite headers

sudo systemctl restart apache2
4.2. Virtual Host Setup
Put the following in /etc/apache2/sites-available/10-nextcloud.conf and make the highlighted changes for your setup. You’ll need to replace the ServerName parameters with your Nextcloud and Collabora FQDNs.
There are three pairs of virtual hosts. One pair for Nextcloud, one pair for Collabora, and one pair to redirect non-SNI requests to Bing. This is an added security measure so that if someone goes to your server by its IP address or any other name, the web server doesn’t show them your Nextcloud instance. With a little luck, they’ll take the hint and move along.
Also, for some of the SSL settings, we will be adapting configuration from https://ssl-config.mozilla.org/. This is a wonderful tool to have, but it doesn’t make clear that some of the settings need to go in different files.
First, edit /etc/apache2/apache2.conf and add the following near the bottom:
Protocols h2 http/1.1
Next, edit /etc/apache2/mods-available/ssl.conf. You will find some of these directives already exist. As of this writing, SSLHonorCipherOrder exists but is already commented, and SSLProtocol and SSLCipherSuite with preset values. Comment out the existing ones and add these at the bottom above </IfModule>:
SSLProtocol             all -SSLv3 -TLSv1 -TLSv1.1
SSLHonorCipherOrder     off
SSLSessionTickets       off
SSLUseStapling          On
SSLStaplingCache "shmcb:logs/ssl_stapling(32768)"
SSLCipherSuite          ECDHE-ECDSA-AES128-GCM-SHA256:ECDHE-RSA-AES128-GCM-SHA256:ECDHE-ECDSA-AES256-GCM-SHA384:ECDHE-RSA-AES256-GCM-SHA384:ECDHE-ECDSA-CHACHA20-POLY1305:ECDHE-RSA-CHACHA20-POLY1305:DHE-RSA-AES128-GCM-SHA256:DHE-RSA-AES256-GCM-SHA384
Put the following in /etc/apache2/sites-available/010-nextcloud.conf
<VirtualHost *:80>
  ServerName cloud.domain.name
  ErrorLog ${APACHE_LOG_DIR}/nextcloud-error.log
  CustomLog ${APACHE_LOG_DIR}/nextcloud-access.log combined
  ProxyPreserveHost On
  ProxyPass / http://127.0.0.1:8080/
  ProxyPassReverse / http://127.0.0.1:8080/
  RewriteEngine On
  RewriteRule ^/\.well-known/carddav http://%{SERVER_NAME}/remote.php/dav/ [R=301,L]
  RewriteRule ^/\.well-known/caldav http://%{SERVER_NAME}/remote.php/dav/ [R=301,L]
</VirtualHost>

<VirtualHost *:443>
  ServerName cloud.domain.name
  ErrorLog ${APACHE_LOG_DIR}/nextcloud-error.log
  CustomLog ${APACHE_LOG_DIR}/nextcloud-access.log combined
  SSLEngine On
  ProxyPreserveHost On
  ProxyPass    / http://127.0.0.1:8080/
  ProxyPassReverse / http://127.0.0.1:8080/
  # Header always set Strict-Transport-Security "max-age=15552000; includeSubDomains"
  RewriteEngine On
  RewriteRule ^/\.well-known/carddav https://%{SERVER_NAME}/remote.php/dav/ [R=301,L]
  RewriteRule ^/\.well-known/caldav https://%{SERVER_NAME}/remote.php/dav/ [R=301,L]
  SSLCertificateFile      /etc/ssl/certs/ssl-cert-snakeoil.pem
  SSLCertificateKeyFile /etc/ssl/private/ssl-cert-snakeoil.key
</VirtualHost>
Put the following in /etc/apache2/sites-available/011-collabora.conf
<VirtualHost *:80>
  ServerName office.domain.name
  ErrorLog ${APACHE_LOG_DIR}/error.log
  CustomLog ${APACHE_LOG_DIR}/access.log combined
  AllowEncodedSlashes NoDecode
  SSLProxyEngine On
  SSLProxyVerify None
  SSLProxyCheckPeerCN Off
  SSLProxyCheckPeerName Off
  ProxyPreserveHost On
  ProxyPass           /loleaflet https://127.0.0.1:9980/loleaflet retry=0
  ProxyPassReverse    /loleaflet https://127.0.0.1:9980/loleaflet
  ProxyPass           /hosting/discovery https://127.0.0.1:9980/hosting/discovery retry=0
  ProxyPassReverse    /hosting/discovery https://127.0.0.1:9980/hosting/discovery
  ProxyPassMatch "/lool/(.*)/ws$" wss://127.0.0.1:9980/lool/$1/ws nocanon
  ProxyPass   /lool/adminws wss://127.0.0.1:9980/lool/adminws
  ProxyPass           /lool https://127.0.0.1:9980/lool
  ProxyPassReverse    /lool https://127.0.0.1:9980/lool
  ProxyPass           /hosting/capabilities https://127.0.0.1:9980/hosting/capabilities retry=0
  ProxyPassReverse    /hosting/capabilities https://127.0.0.1:9980/hosting/capabilities
</VirtualHost>

<VirtualHost *:443>
  ServerName office.domain.name
  ErrorLog ${APACHE_LOG_DIR}/error.log
  CustomLog ${APACHE_LOG_DIR}/access.log combined
  SSLEngine on
  AllowEncodedSlashes NoDecode
  SSLProxyEngine On
  SSLProxyVerify None
  SSLProxyCheckPeerCN Off
  SSLProxyCheckPeerName Off
  ProxyPreserveHost On
  ProxyPass /loleaflet https://127.0.0.1:9980/loleaflet retry=0
  ProxyPassReverse /loleaflet https://127.0.0.1:9980/loleaflet
  ProxyPass /hosting/discovery https://127.0.0.1:9980/hosting/discovery retry=0
  ProxyPassReverse /hosting/discovery https://127.0.0.1:9980/hosting/discovery
  ProxyPassMatch "/lool/(.*)/ws$" wss://127.0.0.1:9980/lool/$1/ws nocanon
  ProxyPass /lool/adminws wss://127.0.0.1:9980/lool/adminws
  ProxyPass /lool https://127.0.0.1:9980/lool
  ProxyPassReverse /lool https://127.0.0.1:9980/lool
  ProxyPass /hosting/capabilities https://127.0.0.1:9980/hosting/capabilities retry=0
  ProxyPassReverse /hosting/capabilities https://127.0.0.1:9980/hosting/capabilities
  SSLCertificateFile      /etc/ssl/certs/ssl-cert-snakeoil.pem
  SSLCertificateKeyFile /etc/ssl/private/ssl-cert-snakeoil.key
</VirtualHost>
Put the following in /etc/apache2/sites-available/999-catchall.conf
<VirtualHost *:80>
  RedirectMatch permanent ^/(.*)$ https://www.bing.com
  ErrorLog ${APACHE_LOG_DIR}/catchall-error.log
  CustomLog ${APACHE_LOG_DIR}/catchall-access.log combined
</VirtualHost>

<VirtualHost _default_:443>
  RedirectMatch permanent ^/(.*)$ https://www.bing.com
  ErrorLog ${APACHE_LOG_DIR}/catchall-error.log
  CustomLog ${APACHE_LOG_DIR}/catchall-access.log combined
  SSLEngine on
  SSLCertificateFile   /etc/ssl/certs/ssl-cert-snakeoil.pem
  SSLCertificateKeyFile /etc/ssl/private/ssl-cert-snakeoil.key
</VirtualHost>
Now, disable the default site and enable the three new sites, and restart apache:
sudo a2dissite 000-default.conf
sudo a2ensite 010-nextcloud.conf
sudo a2ensite 011-collabora.conf
sudo a2ensite 999-catchall.conf

sudo systemctl restart apache2
sudo systemctl status apache2
If all goes well, Apache should be running without errors (other than AH00558 which you can ignore).
4.3.Let’s Encrypt Setup
Your Apache reverse proxy has no backend server to proxy to yet, however you can go ahead and get your Let’s Encrypt certificate in order. You will need to have port 80 forwarded to your server for this to work.
This part is actually pretty straightforward. Head to https://certbot.eff.org/lets-encrypt/ubuntubionic-apache and follow their instructions.
Note that when you run certbot --apache that you do not need (or want) the certificate to include your catch-all site. Its better if you display the default self-signed certificate there because displaying a real certificate with your server’s FQDNs as subject alternate names would reveal the FQDNs needed to access Nextcloud. One other thing to note about this, your default self-signed certificate will probably have your server’s hostname in it. If you want, you can generate a new self-signed certificate with openssl for the catch-all page and substitute it for the default.
You will also be prompted whether you would like to redirect HTTP to HTTPS. This is fine, and certbot will make the changes to your Apache sites config files for you.
5.Configuring Docker Containers
Next you will set up the Docker-Compose file which describes all of the containers to be run. Docker-Compose will manage the set of containers as a group which makes the whole thing much easier.
Create a folder in your home folder called nextcloud. We will be placing several files and folders here.
5.1.Environment Variables
First up is a file called .env in which we will place environment variables for the containers. You will need to change each of these.
NEXTCLOUD_ROOT=/home/username/nextcloud
NEXTCLOUD_IPADDRESS=10.20.30.40
NEXTCLOUD_FQDN=cloud.domain.name
COLLABORA_FQDN=office.domain.name
MYSQL_ROOT_PASSWORD=password
MYSQL_PASSWORD=password
COTURN_SECRET=password
5.2.Docker-Compose.yml
Next, create docker-compose.yml and put this in it. You should be able to use this as-is. Bear in mind that the yml file can be very picky about indentation.
version: '3.7'

networks:
 nextcloud:

services:
  nextcloud:
    image: nextcloud
    container_name: nextcloud
    networks:
      - nextcloud
    ports:
      - "127.0.0.1:8080:80"
    volumes:
      - ${NEXTCLOUD_ROOT}/html:/var/www/html
      - ${NEXTCLOUD_ROOT}/data:/srv/nextcloud/data
    extra_hosts:
      - "${NEXTCLOUD_FQDN}:${NEXTCLOUD_IPADDRESS}"
      - "${COLLABORA_FQDN}:${NEXTCLOUD_IPADDRESS}"
    depends_on:
      - mariadb
      - redis
    environment:
      - NEXTCLOUD_TRUSTED_DOMAINS='${NEXTCLOUD_FQDN}'
      - NEXTCLOUD_DATA_DIR=/srv/nextcloud/data
      - MYSQL_DATABASE=nextcloud
      - MYSQL_USER=nextcloud
      - MYSQL_PASSWORD=${MYSQL_PASSWORD}
      - MYSQL_HOST=nextcloud-mariadb
      - REDIS_HOST=nextcloud-redis
    restart: unless-stopped

  mariadb:
    image: mariadb
    container_name: nextcloud-mariadb
    restart: unless-stopped
    volumes:
      - ${NEXTCLOUD_ROOT}/mariadb:/var/lib/mysql
    environment:
      - MYSQL_ROOT_PASSWORD=${MYSQL_ROOT_PASSWORD}
      - MYSQL_PASSWORD=${MYSQL_PASSWORD}
      - MYSQL_DATABASE=nextcloud
      - MYSQL_USER=nextcloud
    networks:
      - nextcloud

  redis:
    image: redis
    container_name: nextcloud-redis
    networks:
      - nextcloud
    restart: unless-stopped

  coturn:
    image: instrumentisto/coturn
    container_name: nextcloud-coturn
    restart: unless-stopped
    ports:
      - "3478:3478/tcp"
      - "3478:3478/udp"
    networks:
      - nextcloud
    command:
      - -n
      - --log-file=stdout
      - --min-port=49160
      - --max-port=49200
      - --realm=${NEXTCLOUD_FQDN}
      - --use-auth-secret
      - --static-auth-secret=${COTURN_SECRET}

  collabora:
    image: collabora/code
    container_name: nextcloud-collabora
    restart: unless-stopped
    networks:
      - nextcloud
    ports:
      - "127.0.0.1:9980:9980"
    extra_hosts:
      - "${NEXTCLOUD_FQDN}:${NEXTCLOUD_IPADDRESS}"
      - "${COLLABORA_FQDN}:${NEXTCLOUD_IPADDRESS}"
    environment:
      - 'domain=${NEXTCLOUD_FQDN}'
      - 'dictionaries=en'
    cap_add:
      - MKNOD
    tty: true
5.3.Creating And Starting Containers
Unleash the Docker magic:
docker-compose up -d
Docker-Compose will now download all of the necessary images, set up the containers, and start everything in the proper order.
A few notes about running these containers:
- You must be in the same folder as docker-compose.yml.
- If you make any changes to docker-compose.yml, you can run docker-compose up -d again to automatically recreate the container with the new configuration.
- To update your contianers, run docker-compose pull and then docker-compose up -d . Then to dump the old images, run docker image prune --force .
- If you have built an image with a Dockerfile, docker-compose pull will fail to pull it. Then just run docker-compose build --pull before running docker-compose up -d.
- To check the status of your containers, run docker-compose ps .
- Persistent data (your Nextcloud data and database) are in the subfolders, so even if you delete your containers, your data is safe.
Also, an important note regarding the Nextcloud data folder. The documentation states that it should be outside the web root. The mount point of the data folder on the host is largely irrelevant; we need the data folder to be outside the web root inside the container. The docker-compose.yml directive for mounting the data folder creates the folder both on the host and inside the container, however it will be owned by root. We need to change it to www-data or we will get an error during setup. At this point you should see the data folder under your nextcloud folder along with html and mariadb.
chown www-data:www-data data
DO NOT change the ownership or permissions of the html or mariadb folders.* change the ownership or permissions of the html or mariadb folders.
5.4.Adding Features
If you need SMB external storage, you’ll notice it isn’t available. This is because, for whatever reason, they don’t include smbclient in the Docker image. I have no idea why. Fortunately, there is an automated process to rebuild the image with any changes that are needed. This process is described here https://hub.docker.com/_/nextcloud/ under Adding Features. There is a link to some example Dockerfile files, one of which installs smbclient in the image.
I’ll give you the short version. Basically what you’ll do is create a file in the same folder as docker-compose.yml called Dockerfile with one of the examples or whatever other commands you want to modify the image.
Then, you will edit your docker-compose.yml. Under nextcloud, at the image: directive, you will add a custom tag (which could literally be nextcloud:custom). Then you will add a new line under it with the same indentation which says “build: .” When docker-compose is putting together the containers, it will recognize that this one needs to be built instead of pulled. The rest of the process is automatic.
Note that when you’re updating containers, when you run docker-compose pull , it will fail to pull this image because it doesn’t exist. You can ignore the error. After pulling the other images, run docker-compose build --pull and it will build an updated version of your custom image.
6.Nextcloud Setup
At this point, you should be able to go to http://cloud.domain.name and complete the Nextcloud setup wizard. The only thing you should need to do is create your initial admin account. Everything else is taken care of already by the environment variables set in docker-compose.yml.
If your intention is to use Collabora, you probably don’t want to leave the box checked to install OnlyOffice.
6.1.Finishing Initial Nextcloud Setup
In Nextcloud, if you head over to Settings > Administration > Overview, you’ll notice there are several warnings. We’ll take care of the trusted proxy setting below.
There is also a warning about enabling HSTS. This line is already in the Apache site configs, but it’s commented out. Once you’re comfortable your Let’s Encrypt setup is working fine, you can uncomment this line and reload Apache to enable HSTS.
As for the other warnings, they include instructions on how to fix them.
This page should be clear of all warnings when we’re finished.
6.2.Running OCC
If you have any experience with Nextcloud, you know there is a command line utility called OCC that you’ll need from time to time. OCC is inside the Nextcloud Docker container. To make life easier, you can add a bash alias so that you can easily run OCC commands from outside the container.
echo alias occ=\'docker exec -it -u www-data nextcloud php occ\' >> ~/.bashrc

. ~/.bashrc
You can now simply type occ and the command will be sent to the Nextcloud container. To resolve the trusted proxy issue, run these commands:
occ config:system:set trusted_proxies 1 --value='127.0.0.1'
occ config:system:set overwritehost --value="cloud.domain.name"
occ config:system:set overwriteprotocol --value="https"
These are documented here: https://docs.nextcloud.com/server/18/admin_manual/configuration_server/reverse_proxy_configuration.html
6.3.Collabora Setup
Go to Apps > Office & text, and install the Collabora Online app.
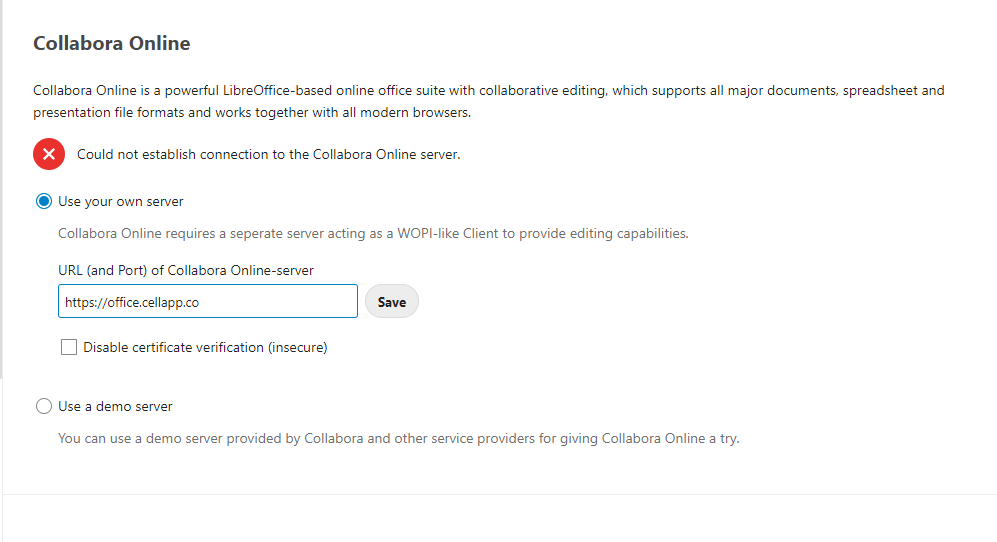
Then go to Settings > Administration > Collabora Online. Plug in https://office.domain.name and hit Apply.
That should be it. You can test by creating a new document and then clicking on it.
6.4. Nextcloud Talk Setup
Go to Apps > Social & communication, and install Talk.
Then go to Settings > Administration > Talk. Add a TURN server. Use cloud.domain.name:3489 for the server. Plug in the COTURN secret from your .env file. You will need to forward TCP and/or UDP port 3478 to your server and set the drop-down accordingly.