1. Enable SSH
If you’ve already activated SSH via CLI and changed default password then you can skip this and go to step 3. Public key
If you haven’t done so already or have been using peripherals connected to the NCP device, now is the time to enable SSH.
This will prompt you to enter a new password for the pi user.
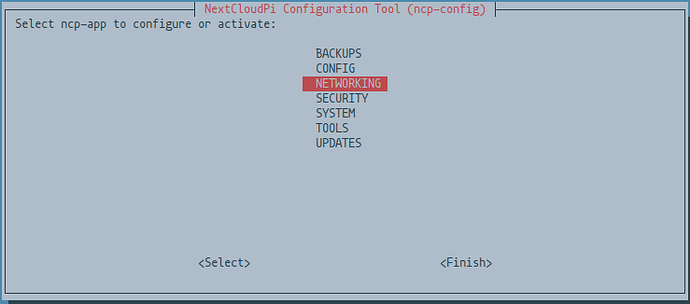
sudo ncp-config
Select NETWORKING and scroll down until you see SSH and enable it.
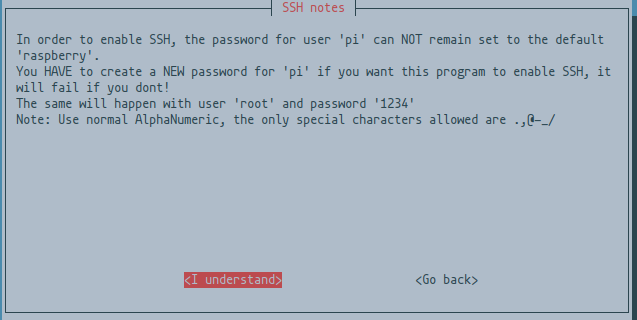
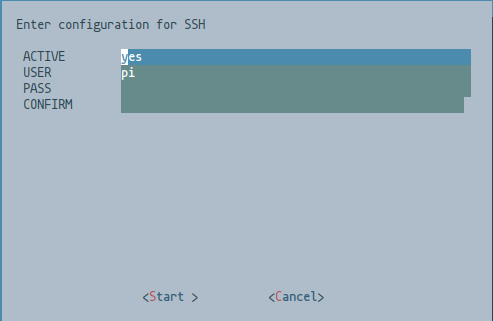
You will be prompted to enter a new password and user when you activate it via ncp-config. Hit Enter on <I understand>
Change the username here from pi to your new user and password
We’ll leave the
SSHconnection port on the defaultport 22for now, since we want to make sure it works to connect with the new user first.
If you don’t already know what port to pick it can be a good idea to check Wikipedia’s list of ports and not pick any listed port.
2. Test the SSH connection
Make sure so you are able to connect with your newly created user from another device via SSH at this point before you proceed.
ssh {USERNAME}@nextcloudpi.local
Or this one :
ssh {USERNAME}@{IP-ADDRESS}
If you were able to connect successfully now it’s time to make the public-keys, so go ahead and exit your SSH session, or open another terminal on the second device.
3. Public-key
On the second device, if you do not already have one, generate an RSA encryption key with
ssh-keygen
and set a password for the key.
The default location is
Private key: ~/.ssh/id_rsa
Public key: ~/.ssh/id_rsa.pub
Copy the newly created public key, or existing public key to /home/{USERNAME}/.ssh/authorized_keys on the NCP device.
ssh-copy-id {USERNAME}@{IP-ADDRESS}
Or, if copy-id doesn’t work
You can use cat ~/.ssh/id_rsa.pub and highlight it in the terminal and copy with Ctrl + Shift + C & paste with Ctrl + Shift + V.
Or something like this
cat ~/.ssh/id_rsa.pub | ssh {USERNAME}@{IP-ADDRESS} 'mkdir -p ~/.ssh && cat > ~/.ssh/authorized_keys'
Check so your public-key has been added successfully.
# If you are signed in to that user
cat $HOME/.ssh/authorized_keys

# If you are not signed in to that user, you might need to use `sudo`
cat /home/{USERNAME}/.ssh/authorized_keys
Set the right permissions for $HOME and ~/.ssh directory and the authorized_keys file if necessary.
chmod g-w $HOME
chmod 700 $HOME/.ssh
chmod 600 $HOME/.ssh/authorized_keys
4. Configure SSH
Edit sshd_config
sudo nano /etc/ssh/sshd_config
Change these settings
-
Port {PORT-NUMBER}
Don’t forget to port-forward your chosen port from your router to your device’s IP-ADDRESS (tcp) -
PermitRootLogin no -
MaxAuthTries 3 -
MaxSessions 2 -
PubkeyAuthentication yes -
PasswordAuthentication no -
ChallengeResponseAuthentication no
Change to yes if you install 2FA-authentication for the device itself later. -
UsePAM yes -
Finally add these lines at the end
DenyUsers pi
AllowUsers {USERNAME}
Save and add a rule to UFW if you intend on using it, don’t enable ufw before setting this rule or you will disconnect. Remember that the default port if unchanged is port 22 which should be the one you are currently connected through.
-
Add rule
sudo ufw allow {PORT-NUMBER}/tcp -
Restart SSH service
sudo systemctl restart ssh
Time to test your keys!
Manual
man sshd_config
5. Test your keys
Time to test your newly added public-key authentication and make sure it work. ![]()
- Open a new terminal on the second device while keeping the first session open, and attempt to connect to the device again.
ssh -p {PORT-NUMBER} {USERNAME}@{IP-ADDRESS}
Or
ssh -p {PORT-NUMBER} {USERNAME}@nextcloudpi.local
If you are being asked for the password of your RSA public-key and were able to connect succesfully, congratulations! It works
6. Finalize
-
Stop the port 22 port-forwarding, if it was enabled, and enable port-forwarding of your selected custom port for SSH
-
Edit
sshd_configagain and remove the extra allowed session
FromMaxSessions 2
ToMaxSessions 1, though be mindful if you’re doing development work or perhaps something else where a second session might be necessary or useful and choose a suitable number at your discretion.
If you use UFW
Remember to set the rules before you enable ufw else you might accidentally disconnect if you’re connected through SSH.
Default port if unchanged is port 22.
- Allow your custom SSH port
(Mentioned in Configure SSH)
sudo ufw allow {PORT-NUMBER}/tcp
-
Deny access in UFW on port 22.
(Setup a custom port first!)
sudo ufw deny 22 -
Deny
HTTPaccess
sudo ufw deny http
Remember to open this again when you renew your certificate with Letsencrypt, or port 80 -
Allow
HTTPSaccess
sudo ufw allow https
Allows port 443
See the manual for more information on usage
man ufw
We hope this doc was helpful, if you encounter any issues please reach out to the community. These docs are written by volunteers, please consider becoming one of them, you can contact the wiki team at Matrix or Telegram
About the Author
This article was worked on by @ZendaiOwl . Thank you so much for all you do! You may write your own articles by joining our wiki and documentation team on the forum.


