
Note: This article is now outdated and needs to be updated. The pi user has been removed from the raspbian OS itself and as such the install scripts for ncp as well.
Please reactivate the login for ncp in the SSH activation of the admin web interface for now, or create a new user using the Raspberry Pi imager or the userconf.txt file
In this article we’ll go through how to create a new user with sudo permissions and delete the default pi user.
This guide presumes a Raspberry Pi device and a Linux environment for the second device.
Source article for deleting Pi user : Pragmatic Linux - Delete Pi User
1. Create a new user with a username of your choice.
sudo add user {username}
2. Add the new user to all of the pi user’s groups
With the new user account created, we continue by adding the user to the exact same groups as the pi user belongs to, excluding the user specific pi group itself since we will remove it when deleting the pi user later on.
With the help of some command piping, we can achieve this step with a one-liner command:
groups | sed 's/pi //g' | sed 's/ /,/g' | xargs -I{} sudo usermod -a -G {} {username}
When running this command, don’t forget to replace {username} with the username of the new user.
This command basically creates a comma separated list of the groups that the pi user belongs to, but removes the pi group.
With the help of the xargs command, we then feed the resulting list into the usermod command. The {} after the -G parameter becomes the group list.
Although optional, you could run the first three commands manually to better understand how the command works and what it did :
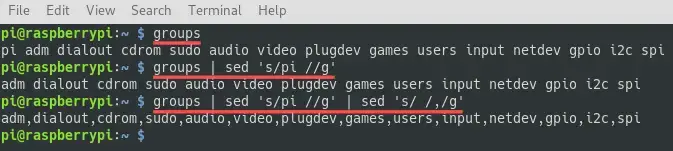
Before moving on to the next section, log out the pi user and log back in, with the credentials of the newly created user account. In my case I do this with SSH.
If you run the Raspberry Pi operating system with a desktop environment, you can do this with the login manager.
3. Copy pi user’s $HOME directory
Later on we intend to completely delete the pi user account, including the contents of its home directory.
Therefore it might be a good idea to copy the contents of the pi user’s home directory, to the home directory of the newly created user.
While signed in as pi user
sudo usermod -d /home/pi -m {username}
Note that the /. after the [SOURCE] directory is important.
You only want the contents inside the [SOURCE] directory. Otherwise you end up with a [SOURCE] subdirectory. The -R flag makes the copy operation recursive, so including all subdirectories and their content.
:: Syntax Example ::
cp -R [SOURCE]/. [DESTINATION]
Notice the dot ( . ) at the end of [SOURCE]/.
Run the following command, assuming that you are logged in as the new user:
sudo cp -R /home/pi/. /home/$USER
4. Set permissions
The files from the /home/pi are owned by the pi user, therefore we used sudo, it also means that we still need to change the owner to the new user ($USER).
The following command makes sure the new user owns all the files and directories in its home directory, including those we just copied:
sudo chown -R $USER: /home/$USER
5. Delete Pi user
At this point we created and configured the user account for our new user. As a next step we completely delete the pi user from our Raspberry Pi.
This last step is actually the easiest part, just open up the terminal and run the following cmd
sudo deluser --remove-home pi
The pi user is now officially gone, including its home directory. If you’d rather keep its home directory, then omit the --remove-home part from the command.
6. Password protect sudo
Make sure to use visudo for editing this file, which includes syntax checking and save protection. If you save this file with a syntax error you will not be able to open it and fix the typo, since you need sudo to open it!
If you’re using nano, it is:
Ctrl + X = Exit
Ctrl + S = Save
Or
Ctrl + S and Ctrl + X = Save and Exit
If you don’t know the commands for the editor you choose, please look it up ![]()
Edit 010_pi-nopasswd using :
sudo visudo -f /etc/sudoers.d/010_pi-nopasswd
Either comment ( # ) it out or check so it’s set to :
pi ALL=(ALL) PASSWD: ALL
If you set it to :
pi ALL=(ALL) NOPASSWD: ALL
You will not be required to use a password for sudo with the pi user/group.
Once finished with this consider continuing on with configuring Public-key Authentication for SSH
We hope this doc was helpful, if you encounter any issues please reach out to the community. These docs are written by volunteers, please consider becoming one of them, you can contact the wiki team at Matrix or Telegram
Please review this for any typos and edits @NCP_Wiki_Team
About the Author
This article was worked on by ZendaiOwl. Thank you so much for all you do! You may write your own articles by joining our wiki and documentation team on the forum.