
Difficulty Level: medium
There are multiple ways of running NCP on a Proxmox Server. All have their advantages and disadvantages. This tutorial will present you with one of the options. It is intended to help beginners and does not claim to be the best solution. We encourage you to try multiple ways and choose the one that suits you best.
Goal
- Run a Debian (11) Bullseye VM and install NCP using the
curlinstaller
Covered in this Tutorial
- Install NCP on a Proxmox Server
- Pass-through a drive for NC data
- Restore NC data from an external USB backup drive.
1. Install NCP on a Proxmox Server
-
Navigate to the latest debian-11.X.X-amd64-netinst.iso image and copy the URL in order to directly download it to your Proxmox host.
a. using theshellof the Proxmox host change to the directory where Proxmox stores its images:
cd /var/lib/vz/template/iso/
b. with theẁgetcommend pull the latest image (example:wget https://cdimage.debian.org/debian-cd/current/amd64/iso-cd/debian-11.6.0-amd64-netinst.iso)
Note: Alternativly you can also download the netinst.iso to your computer first and then upload it to your proxmox over the Web UI. -
Set up the Debian VM in Proxmox and give it the resources you wish. (min 2GB of RAM but ideally much more. If you want to use a separate physical drive for data (see 2. Pass-through a Drive for NC Data), you don’t need more than 8GB of disk space, if not, just give it as much as you need for your data.)
-
Boot into the VM and use the Proxmox shell of the VM to go thorough the installation process.
Note: A bare minimum installation of Debian will be sufficient. -
After the initial installation, ssh as
rootinto the VM (you might need to enableroot loginfrom the Proxmox shell before you can use ssh (here is how). Alternatively, just use the Proxmox shell for the steps below (note: copy and paste does not work in the VM shell) -
Install updates:
apt updates && apt upgrade -y -
Install curl:
apt install curl -
Install NCP as root by running:
curl -sSL https://raw.githubusercontent.com/nextcloud/nextcloudpi/master/install.sh | bash -
Access & Activate NCP using the VM’s IP from your browser
2. Pass-through a Drive for NC Data
In this case, we are going to pass-through an entire, physical drive. If you wish to only pass-through part of a drive, as virtual drive commands will be slightly different. (Check out this and the official Proxmox docs)
Note: If you gave the VM enough disk space to hold all NC data on its own, you can skip this step.
Proxmox Host configuration
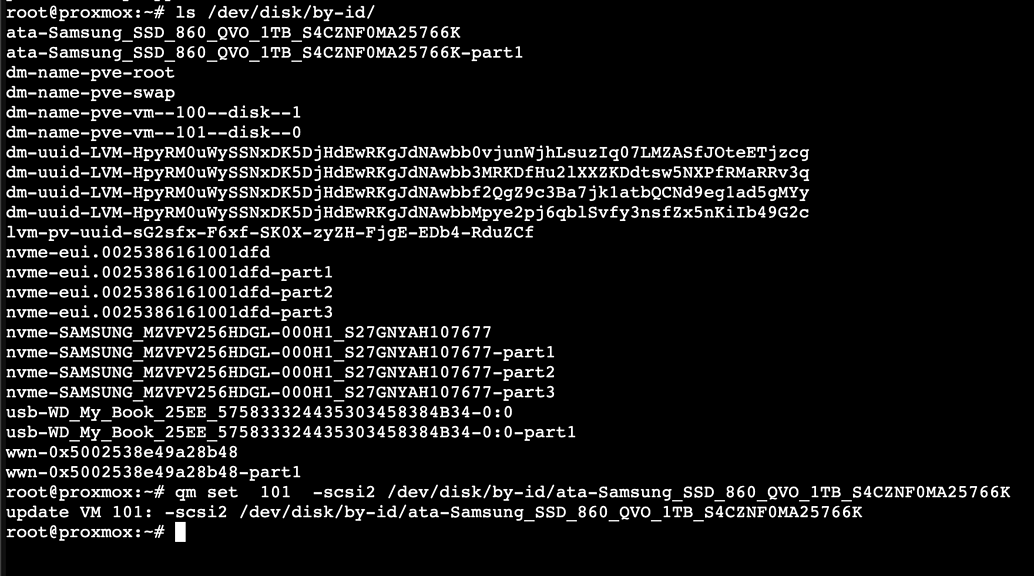
- Use the main (host) Proxmox Terminal and type:
ls /dev/disk/by-id/a list of all your drives, physical and virtual will appear. - Find the drive you wish to pass through to your VM and copy the full drive name.
- Use this command to add it:
qm set VM-ID-NUMBER -scsi2 /dev/disk/by-id/FULL-DRIVE-NAME(see example below)
- Leave the Terminal and navigate to your VM
- In the
Hardwaresection you should now see the drive.

Debian NCP VM Configuration
- Boot your VM and open it’s Terminal or use ssh.
- With the
lsblkcommand, you should see your drive listed.
NOTE: If you are coming from e.g. a RaspberryPi setup and want to use the data drive, still containing the data from the old setup, do not follow the steps below. Simply let your NCP VM instance know where your data directory is & restore your NCP by loading a data-less backup. (How to restore backups) - Delete all data on the drive you want to use as data drive. (sda as example!)
- Type
fdisk -c /dev/sda(This will delete all data onsda) - Type
gto create agptpartition table - Type
nto create a new portion, just hit enter to all (defaults to Linux and max size) - Type
wto save and exit - Run
mkfs.ext4 /dev/sda1(alternatively you can format as BTRFS, to later use thesnapshotfunction of NCP) - Create a mount point, mount it and set auto-mount
- Type
mkdir /media/MY-MOUNT-NAMEcreate mount point - Type
mount /dev/sda1 /media/MY-MOUNT-NAMEmount drive to system - Type
df -hTto see if it is mounted (if it is listed, it’s mounted) - Type
nano /etc/fstaband add the following line so that the drive will be mounted automatically every time you reboot:
/dev/sda1 /media/ncdata ext4 4,nofail 0 0
(it is actually better to use the UUID of the drive instate of/dev/sda1(which identifies what has to be mounted), this way it will still mount correctly even if you move or add drives in your server)
If you use BTRFS, please see here how to mount and edit fstab and adjust the commands above accordingly.
3. Restore NCP Backup from external USB Drive
[incomplete - needs more details]
Attach your Backup drive to your Proxmox host and pass it through to your NCP VM.
In the NCP VM mount it, and restore the backup: How to restore NextcloudPi Backup.
We hope this doc was helpful, if you encounter any issues please reach out to the community.
These docs are written by volunteers, please consider becoming one of them.
Contact the wiki team at Matrix or Telegram