Public IP
Home routers with a public IP assigned to them, often leased (i.e they expire after a certain time and then you are assigned a new one), which you get from an ISP that assigns your router with a public IP for internet access comes with a firewall installed, though not always enabled fully by default.
These firewalls varies in how advanced security features they have available on them but there are a couple basic ones you might encounter on a home router’s firewall such as port flooding protection, ip filtering, mac filtering, port scan protection, port forwarding etc.
Port Forwarding
This feature may or may not be enabled (accessible) on your router depending on your ISP.
One of the firewall’s basic function for a home network is to block network traffic on the outside of your home network (i.e the internet) from accessing the network on the inside and the devices connected in the home network. At the same time it also allows you to download or request data from outside the home network to the inside, this is what happens when you navigate to a website for example.
To lift this restriction, in a way, is what the Port Forwarding feature does by open up a specific port on the outside and expose it to another port of a network device on the inside, specified by IP-adress usually, allowing traffic from the outside through the firewall to the device with the set IP address and port.
In order for you to access your Nextcloud from the outside of your house, you need to allow ports 80 and 443 and forward them to the IP-adress of the device that runs your NextcloudPi instance.
The port forwarding is set up in your routers configuration interface accessible by entering the default gateway IP-adress in a browser, or if your router has UPnP, and it’s enabled, you can try nc-forward-ports which uses miniupnpc to attempt to open the ports on your router automatically via UPnP.
-
Navigate to
nc-forward-portsvia the CLI or in the WebUI. -
Set the ports your Nextcloud runs on.
(Defaults are recommended, 80 & 443)- If it succeeded, that’s great!
However, it’s recommended to turn off UPnP so when finished, login to the router again and turn it off.
- If it succeeded, that’s great!
-
Is UPnP Safe?
The UPnP service becomes dangerous if it establishes connections with devices that are infected with malware. Such connections make DDoS attacks possible.But when UPnP allows safe devices to connect, the established network is safe. So the original intention of UPnP technology is safe. It only becomes dangerous when infected devices are involved.
UPnP offers zero-configuration, meaning no human authentication is required to establish a connection. Ports are automatically forwarded to establish a connection when a UPnP request is received. With such an autonomous, and liberal, networking mechanism, it becomes clear how easy it is for the establishment of infected connections to spiral out of control.
(Source)
DDNS
In order to access Nextcloud from outside of your house a domain name is needed (e.x. cloud.com) or a sub-domain name (cloud.example.com). Domain names reside on a nameserver, or domain name server (DNS), and they (in a simplified way) holds a data table to translate a human-readable webaddress to the destination IP-address of a server for that domain name.
Now if you have a public IP assigned to you by your ISP that stays the same all the time (i.e static IP) that’s great, you are good to go!
However, not all home users have a static IP address assigned to them and instead are assigned a dynamic IP address which changes from time to time. (Remember the lease period mentioned earlier?)
For that reason, in order to keep your DNS record pointing to the correct public IP address that is assigned to you in case of a change, a DDNS (Dynamic DNS) service is used.
NextcloudPi has two different DDNS clients for two different DDNS providers(FreeDNS, No-IP), you have to register for an account on their website.
There you can create a subdomain for free, or connect a domain name you have purchased.
It also isn’t uncommon for your router to support a DDNS service, such as duckdns.org for example, so take a look around in the firewall settings of your router and you might just find a DDNS setting.
FreeDNS (freedns.afraid.org)
Run nextcloud-config in a CLI or use the WebUI.
Log in to freedns.afraid.com and click “Dynamic DNS”. Right click on “Direct URL” next to your record. Paste it in a text editor and select only the hash (the characters after the “?”).
- Navigate to
freeDNSin the TUI or the WebUI. - Change
ACTIVEtoyes - Change the
UPDATEHASHwith yours (delete the example and paste withctrl+shift+V) - Change
DOMAINwith your domain name you have registered. - (Optional) Change the
UPDATEINTERVALto the interval time you want the client to update your IP.
(The default of 5 min should suffice) - Click Run or Start.
Now try and visit the domain name that you have registered and configured in your browser and it should take you to your Nextcloud instance.
No-IP (www.noip.com)
Run nextcloud-config in the CLI or use the WebUI.
- Navigate to
no-ipin the CLI or the WebUI. - Change
ACTIVEtoyes. - Change
USERwith your user name. - Change
PASSwith your password. - Change
DOMAINwith your (sub)Domain Name. - Change
TIMEwith the interval time you want to update the DNS record.
(Default 30 min) - Click Run or Start.
Now try and visit the domain name that you have registered and configured in your browser and it should take you to your Nextcloud instance.
Automatic signed SSL certificates
In order to trust a connection to a website and send your user name and password, you need a SSL certificate. The SSL certificate ensures that the communication is encrypted, so everything you send can only be viewed by the server and not someone who impersonates him. By default NextcloudPi provides a self signed SSL certificate in order to encrypt your communication but it is strongly recomended that you use a certificate from a certificate athority. The NextcloudPi can run the Let’s Encrypt client which gets a certificate from https://letsencrypt.org for your domain name.
NextcloudPi also configures the web server to use it and renews the certificate once a month.
To configure automatic signed SSL certificates (run nextcloud-config in the terminal (CLI) or use the WebUI):
- Navigate to
letsencryptin the terminal (CLI) or the WebUI. - Change the
DOMAINwith your (sub)Domain Name. - Change the
EMAILwith your Email address. (It is recomended to use a valid Email address) - Click Run or Start.
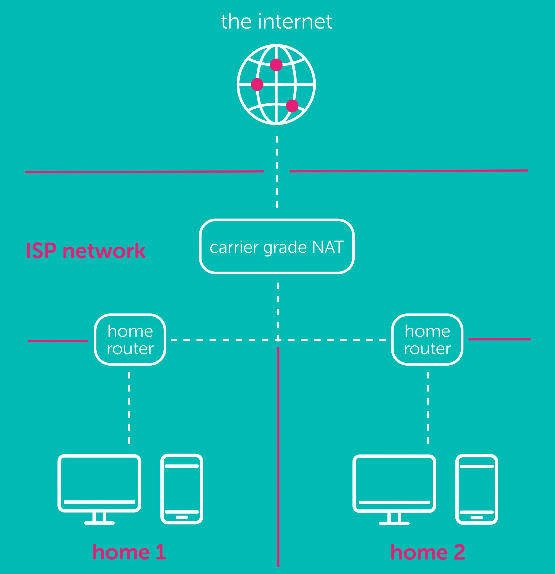
Carrier Grade NAT
What is CG-NAT? and what does it have to do with IPv4 and IPv6?
With most of our devices still using IPv4, we can use something called CG-NAT, known as ‘Carrier Grade NAT’ or ‘Carrier Grade Network Address Translation’ to help us with staying on an IPv4 network as IPv6 adoption grows.
CG-NAT is used in IPv4 residential network designed to basically pool out and share public IP addresses among residential areas. CG-NAT futureproofs IPv4’s and solves the IPv4 shortage to maintain the existing telecom infrastructure, simply by sharing out a public IPv4 address to a number of houses, rather than you having your own individual IPv4 address. Although CG-NAT doesn’t resolve the IPv4 address exhaustion, it is a necessary interim solution whilst the world transitions to IPv6.
How do I access from the outside?
The short and simple answer is via VPN or a Proxy service such as ngrok or localhost.run.
Ngrok
You have to create an account to use this service, they do have a free tier.
Remember that all free tiers services do have their limitations so check them out in their respective docs so you can see when and if they change.
Localhost.run
This service has a free tier as well and one that doesn’t require a sign up.
Remember that all free tiers services do have their limitations so check them out in their respective docs so you can see when and if they change.
https://localhost.run/docs/forever-free
VPN services
- TODO
We hope this doc was helpful, if you encounter any issues please reach out to the community. These docs are written by volunteers, please consider becoming one of them, you can contact the wiki team at Matrix or Telegram