1. Introduction
This guide is designed for self-hosting enthusiasts who want to deploy Nextcloud AIO on their own infrastructure rather than relying on third-party hosting providers.
It assumes that the user already has access to the following:
-
a public IP address,
-
a registered subdomain, and
-
a running Proxmox server.
While the guide primarily focuses on a Proxmox-based home or lab environment, it can also be adapted for VPS installations, provided certain conditions are met.
Throughout this tutorial, we will use NGINX Proxy Manager as a reverse proxy for handling subdomain redirection and SSL certificate management.
For operational monitoring and container management, we will also make use of Portainer, which serves as a control interface for verifying container health and deployment consistency.
The use of an NGINX-based proxy layer is intentional. In a virtualized Proxmox setup, this approach provides flexibility for future expansion — allowing you to easily host additional Docker-based services behind the same proxy without having to expose multiple ports or create redundant configurations.
The entire tutorial is based on real-world experience and practical implementation notes, reflecting a configuration optimized for large-file handling — including multimedia content — ensuring that the Nextcloud Server operates reliably even under heavy I/O and storage workloads.
2. Subdomain Setup and Mapping to Public IP
After purchasing your domain and creating the subdomain that will be used for your Nextcloud AIO server, the next step is to ensure that the subdomain correctly points to your server’s public IP address.
This is done by configuring an A record in the DNS management interface of your domain registrar. The A record associates your chosen subdomain (for example, cloud.mydomain.com) with the public IP address where your Nextcloud instance will be hosted.
In most self-hosting environments, this public IP address is the home internet IP assigned by your ISP to your router or gateway. In that case, all incoming requests to your subdomain will be automatically directed to your home network, where your Proxmox server and the Nextcloud virtual machine are located.
Proper DNS mapping is essential — without it, Let’s Encrypt cannot issue SSL certificates later through NGINX Proxy Manager, and external users will not be able to reach your Nextcloud instance.
3. Proxmox Configuration and Virtual Machine Setup (Ubuntu on XFS with Cache)
In this setup, two separate virtual instances are used within Proxmox:
-
one dedicated to the NGINX Proxy Manager, and
-
another running the Ubuntu Server, which will host the Nextcloud AIO environment.
This separation provides better control, easier maintenance, and clear isolation between the reverse proxy layer and the application stack.
For the Nextcloud virtual machine, using the XFS file system is highly recommended — especially when working with large files such as videos or other multimedia content. XFS offers better performance for parallel I/O operations and handles large datasets more efficiently than ext4.
In addition to the main XFS system volume, this configuration also includes an 8 GB cache layer on the Ubuntu server, which helps to significantly improve read/write performance during heavy file operations.
From personal experience, it is also very important to enable memory ballooning for the virtual machine that runs Nextcloud.
Ballooning allows Proxmox to dynamically reclaim or allocate RAM depending on the system’s current needs — meaning that when your Nextcloud instance requires more memory (for example, during large file transfers or background processing), it can use additional RAM temporarily without requiring a manual VM restart.
At the same time, when the load decreases, unused memory can be released back to the host system, ensuring better efficiency and resource utilization across all running VMs.
The overall configuration of the Ubuntu server within Proxmox will depend on your hardware resources and the number of simultaneous users expected to access the Nextcloud instance.
The allocation of CPU cores and RAM should always be adjusted accordingly — there is no universal setting that fits all environments. Each deployment must be tuned to balance stability, performance, and available physical resources.
4. Virtual Machine Setup for NGINX Proxy Manager
This step assumes that the user has already installed Ubuntu Server manually — following the previous recommendations — and has prepared two separate virtual machines within Proxmox:
-
VM01 → dedicated to NGINX Proxy Manager
Local IP address (example):192.168.1.10 -
VM02 → dedicated to Nextcloud AIO
Local IP address (example):192.168.1.20
Both virtual machines will run Ubuntu Server as the operating system.
Before installing any applications, it is important to ensure that Docker support is available on both VMs — since both NGINX Proxy Manager and Nextcloud AIO will run as Docker containers.
Docker Installation (on both VM01 and VM02)
Important rule:
Do not perform these steps as therootuser.
Always execute the following commands under your regular user account withsudoprivileges.
Running Docker as root is not recommended.
1. Install Docker using the official installation script
curl -fsSL https://get.docker.com | sh
2. Add your user to the Docker group
sudo usermod -aG docker $USER
3. Reboot the system
reboot
After the reboot, Docker will be ready for use on both virtual machines, allowing us to proceed with the installation of Portainer and NGINX Proxy Manager in the next steps.
5. Portainer Installation
Before deploying NGINX Proxy Manager or Nextcloud AIO, it is highly recommended to first install Portainer — a lightweight web-based management interface for Docker.
Portainer provides an intuitive dashboard to monitor and manage containers, images, networks, and volumes, making it much easier to visualize your setup, perform cleanups, and verify that containers are running correctly.
This will be especially helpful later during the Nextcloud AIO deployment and update process.
Installation Steps
These commands can be executed either on VM01 (NGINX Proxy Manager) or VM02 (Nextcloud AIO) — or on both, depending on how you prefer to monitor your Docker environments.
1. Create a directory for Portainer and move into it
mkdir ~/portainer
cd ~/portainer
2. Create the Docker Compose file
nano docker-compose.yml
Paste the following content:
services:
  portainer:
    image: portainer/portainer-ce:latest
    labels:
      - "com.centurylinklabs.watchtower.enable=true"
    container_name: portainer
    restart: always
    ports:
      - "9000:9000"
    volumes:
      - /var/run/docker.sock:/var/run/docker.sock
      - portainer_portainer_data:/data

volumes:
  portainer_portainer_data:
Save and exit Nano (CTRL + O, Enter, CTRL + X).
3. Deploy Portainer
docker compose up -d
4. Access Portainer
Open your browser and navigate to:
http://<server-ip>:9000
Replace <server-ip> with the local IP of your VM (for example 192.168.1.10 or 192.168.1.20).
On first launch, you’ll be prompted to set an admin password.
About the “Label” Section in the Compose File
In the configuration above, you will notice the following block:
labels:
  - "com.centurylinklabs.watchtower.enable=true"
This label is intentionally added to the Portainer container definition. Its purpose will become more relevant later in the tutorial, when we discuss Watchtower — the automated Docker update service.
By assigning this label, we ensure that Watchtower recognizes Portainer as eligible for automatic updates, while other containers (such as Nextcloud AIO) can be deliberately excluded from this process.
This is crucial because Nextcloud AIO must never be updated automatically through Watchtower or any similar mechanism — it requires its own built-in update procedure to maintain data integrity.
Adding the label now allows for a controlled update policy across your Docker ecosystem once Watchtower is introduced later in this guide.
Installing Portainer at this stage allows you to easily:
-
verify that Docker is working properly,
-
monitor all running containers,
-
manage images and volumes visually,
-
and clean up any leftover volumes from previous installations (for example, old Nextcloud containers).
Portainer will also be used later for routine updates, troubleshooting, and container health verification — making it a core management tool throughout this guide.
6. Router Port Forwarding and NGINX Proxy Manager Installation
This section covers two key steps:
-
Configuring router port forwarding so that external requests reach the correct virtual machines, and
-
Installing NGINX Proxy Manager (NPM) to handle SSL termination and domain routing for the Nextcloud AIO environment.
6.1 Router Port Forwarding
To make your services accessible from the internet, specific ports on your public IP address must be forwarded from your router to the internal IPs of your Proxmox virtual machines.
| Port | Protocol | Destination VM | Internal IP | Purpose |
|---|---|---|---|---|
| 80 | TCP | VM01 (NGINX Proxy Manager) | 192.168.1.10 |
HTTP (Let’s Encrypt challenge, web redirection) |
| 443 | TCP | VM01 (NGINX Proxy Manager) | 192.168.1.10 |
HTTPS (secure web access to Nextcloud and other services) |
| 3478 | UDP | VM02 (Nextcloud AIO) | 192.168.1.20 |
STUN/TURN (required for Nextcloud Talk High Performance Backend) |
Port Forwarding Logic
-
Ports 80 and 443
These must be forwarded from your router/firewall directly to the VM running NGINX Proxy Manager (VM01).
NPM will handle SSL certificate management (via Let’s Encrypt) and reverse proxy routing to the internal Nextcloud container (e.g. port11000inside AIO). -
Port 3478 (UDP)
This port is used by the Nextcloud Talk High Performance Backend.
It must be forwarded directly from your router to the Nextcloud AIO VM (VM02).
Do not route this through NGINX Proxy Manager — doing so will break Talk’s STUN/TURN functionality.
Connection Flow Overview
Public IP → Router (80/443) → VM01 (NGINX Proxy Manager) → Nextcloud AIO container
Public IP → Router (3478/UDP) → VM02 (Nextcloud AIO)
This ensures that:
-
Web traffic and certificates are managed centrally via NPM
-
Real-time communication (Nextcloud Talk) is handled correctly over UDP
6.2 Installing NGINX Proxy Manager
Now that the ports are properly forwarded, proceed to deploy NGINX Proxy Manager (NPM) on VM01 (192.168.1.10).
1. Create a directory for NPM and move into it
mkdir -p ~/nginx-proxy-manager
cd ~/nginx-proxy-manager
2. Create the Docker Compose file
nano docker-compose.yml
Paste the following content (replace passwords with your own secure values):
services:
  app:
    image: "jc21/nginx-proxy-manager:latest"
    restart: unless-stopped
    ports:
      - "80:80"
      - "81:81"     # Web UI
      - "443:443"
    environment:
      PUID: 1000
      PGID: 1000
      DB_MYSQL_HOST: "db"
      DB_MYSQL_PORT: 3306
      DB_MYSQL_USER: "tony"
      DB_MYSQL_PASSWORD: "ChangeThisPassword123!"
      DB_MYSQL_NAME: "nginxpm"
    volumes:
      - ./data/app:/data
      - ./letsencrypt:/etc/letsencrypt

  db:
    image: "jc21/mariadb-aria:latest"
    restart: unless-stopped
    environment:
      MYSQL_ROOT_PASSWORD: "ChangeRootPassword123!"
      MYSQL_DATABASE: "nginxpm"
      MYSQL_USER: "tony"
      MYSQL_PASSWORD: "ChangeThisPassword123!"
    volumes:
      - ./data/mysql:/var/lib/mysql
Save and exit Nano (CTRL + O, Enter, CTRL + X).
3. Start the NPM stack
docker compose up -d
4. Access the NPM Web Interface
Open your browser and go to:
http://192.168.1.10:81
Default credentials:
Email: admin@example.com
Password: changeme
You will be asked to change your credentials upon first login.
What Happens Next
At this point, NGINX Proxy Manager is fully operational. You can now:
-
add your domain (
cloud.mydomain.com), -
request SSL certificates via Let’s Encrypt,
-
and configure reverse proxy rules to forward HTTPS traffic to your Nextcloud AIO container running on VM02 (192.168.1.20).
This completes the network and proxy configuration, setting the stage for the actual Nextcloud AIO installation in the next step.
7. Nextcloud AIO Installation
With NGINX Proxy Manager and Portainer already set up, we can now proceed with the installation of Nextcloud All-in-One (AIO) on VM02 (192.168.1.20).
This step will deploy the main Nextcloud AIO Mastercontainer, which manages all required internal containers — including the database, Redis, Collabora/OnlyOffice, and Talk backend components.
 Reference Video
For a clear visual walkthrough of the process, you can watch this video demonstration:
![]() Nextcloud AIO Installation – Full Setup Guide (YouTube)
Nextcloud AIO Installation – Full Setup Guide (YouTube)
It provides a good overview of how the AIO stack initializes and what to expect during the first setup.
7.1 Initial AIO Installation (First Run)
During the first deployment, you must not include the external: true line under the volumes section.
This allows Docker to automatically create a new volume where all AIO configuration data will be stored.
Create the working directory and move into it:
mkdir ~/nextcloud-aio
cd ~/nextcloud-aio
Then create the docker-compose.yml file:
nano docker-compose.yml
Paste the following content:
volumes:
  nextcloud_aio_mastercontainer:
    name: nextcloud_aio_mastercontainer  # must be exact name
    external: false

services:
  nextcloud:
    image: ghcr.io/nextcloud-releases/all-in-one:latest
    restart: unless-stopped
    container_name: nextcloud-aio-mastercontainer
    volumes:
      - nextcloud_aio_mastercontainer:/mnt/docker-aio-config
      - /var/run/docker.sock:/var/run/docker.sock:ro
      - /etc/cups/client.conf:/etc/cups/client.conf:ro
    ports:
      - "6789:8080"  # AIO web UI
    environment:
      - APACHE_PORT=11000
      - NEXTCLOUD_MEMORY_LIMIT=4096M
Start the container:
docker compose up -d
Once started, open your browser and go to:
https://192.168.1.20:6789
You will be presented with the Nextcloud AIO web interface, where you can initialize the setup and complete the guided installation.
7.2 After Installation / Later Restarts
After the initial setup is complete, Docker has already created the volume nextcloud_aio_mastercontainer.
From this point forward, whenever you need to restart or recreate the AIO Mastercontainer (for example, after stopping Docker or rebooting the host), you must explicitly mark this volume as external in the compose file.
Update the docker-compose.yml as follows:
volumes:
  nextcloud_aio_mastercontainer:
    name: nextcloud_aio_mastercontainer  # must be exact name
    external: true

services:
  nextcloud:
    image: ghcr.io/nextcloud-releases/all-in-one:latest
    restart: unless-stopped
    container_name: nextcloud-aio-mastercontainer
    volumes:
      - nextcloud_aio_mastercontainer:/mnt/docker-aio-config
      - /var/run/docker.sock:/var/run/docker.sock:ro
      - /etc/cups/client.conf:/etc/cups/client.conf:ro
    ports:
      - "6789:8080"
    environment:
      - APACHE_PORT=11000
      - NEXTCLOUD_MEMORY_LIMIT=4096M
7.3 Why external: true Matters
On the first run, Docker automatically creates the nextcloud_aio_mastercontainer volume to store the entire configuration of your AIO environment.
If you later restart or recreate the container without marking this volume as external: true, Docker will treat it as a new volume — effectively creating a blank configuration and losing the existing AIO setup.
By adding:
external: true
you are instructing Docker to reuse the existing configuration volume that was created during the first installation.
This guarantees that all Nextcloud settings, database connections, certificates, and user data remain intact even after restarting or rebuilding the container.
At this point, your Nextcloud AIO Mastercontainer is running and accessible at:
https://192.168.1.20:6789
From here, proceed with the on-screen setup steps and let AIO automatically deploy all subcontainers in the background.
7.4 Using Portainer During the Installation
During the AIO setup process, Portainer becomes a very useful companion tool.
You can open Portainer in your browser and observe, in real time, how the installation unfolds — which containers have already started, which are still initializing, and whether any of them have encountered errors.
Portainer allows you to:
-
monitor container creation and logs during the installation,
-
confirm that dependent services (like database or Redis) have launched correctly,
-
and quickly identify potential issues before the setup finishes.
This visibility is particularly valuable because the AIO installer runs multiple containers in sequence, and monitoring them through Portainer helps ensure the installation completes smoothly without unnoticed failures.
8. NGINX Proxy Configuration for Nextcloud AIO
After successfully deploying Nextcloud AIO, the next step is to correctly configure NGINX Proxy Manager (NPM).
This configuration ensures that your public domain (e.g., cloud.mydomain.com) properly forwards traffic to the internal AIO container running on your Proxmox VM.
NPM also handles SSL certificates, HTTP/2, and upload-related parameters that are critical for large file handling within Nextcloud.
8.1 Accessing the NGINX Proxy Manager
Open your browser and navigate to:
http://192.168.1.10:81
Log in to the NPM web interface using your admin credentials.
Go to Proxy Hosts → Add Proxy Host (or edit an existing one if you already created the entry for your subdomain).
8.2 Details Tab
In the Details tab, enter the following configuration:
| Field | Value / Description |
|---|---|
| Domain Names | Your subdomain, e.g. cloud.mydomain.com |
| Scheme | http |
| Forward Hostname / IP | 192.168.1.20 (IP of your Nextcloud AIO VM) |
| Forward Port | 11000 |
| Cache Assets | Disabled |
| Block Common Exploits | |
| Websockets Support | |
| Access List | Publicly Accessible |
Example (screenshot):

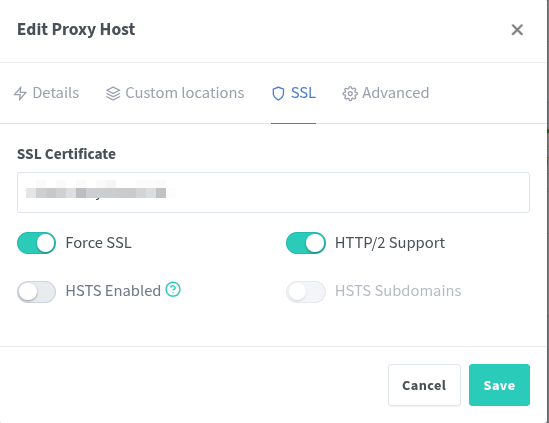
8.3 SSL Tab
Next, switch to the SSL tab and configure:
| Setting | Value |
|---|---|
| SSL Certificate | Select your Let’s Encrypt certificate for the subdomain |
| Force SSL | |
| HTTP/2 Support | |
| HSTS Enabled | Optional (can be left off) |
| HSTS Subdomains | Disabled |
Example (screenshot)
8.4 Advanced Tab
Finally, open the Advanced tab and insert the following configuration block:
client_body_buffer_size 512k;
proxy_read_timeout 86400s;
client_max_body_size 0;
Example (screenshot)
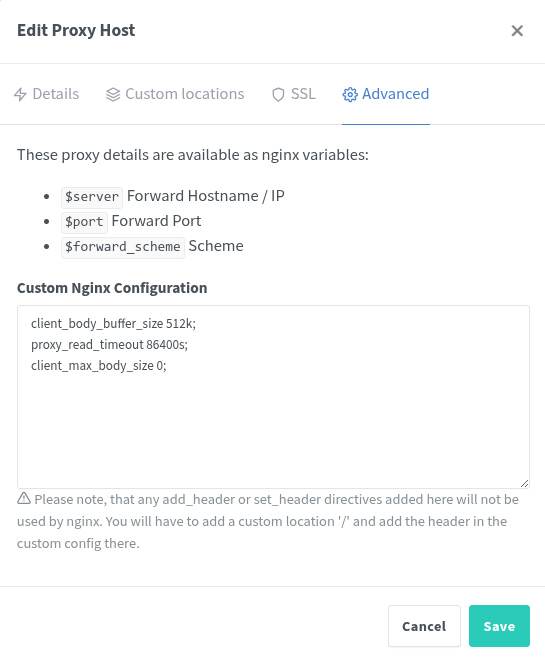
8.5 Explanation of the Advanced Settings
-
client_body_buffer_size 512k;— Prevents client request buffering issues, improving stability for larger POST requests. -
proxy_read_timeout 86400s;— Extends the timeout to 24 hours, allowing long-running uploads or background operations without disconnects. -
client_max_body_size 0;— Removes any upload size limit imposed by NGINX, ensuring that Nextcloud can handle very large file uploads. This parameter is essential for environments where users synchronize or upload large multimedia files.
Summary
Once these settings are applied:
-
All HTTPS traffic to
cloud.mydomain.comwill be securely routed through NPM to Nextcloud AIO (192.168.1.20:11000). -
SSL certificates will renew automatically via Let’s Encrypt.
-
Large file uploads will function correctly without being blocked by proxy limits.
-
Real-time communication (Talk) remains unaffected, since the UDP port
3478is forwarded directly to the Nextcloud VM.
At this stage, your reverse proxy layer is fully configured — completing the bridge between your public subdomain and the internal Nextcloud AIO instance.
9. Troubleshooting & Updating Nextcloud AIO
Updating Nextcloud AIO requires a very specific workflow.
Unlike other Docker containers, Nextcloud AIO must never be updated automatically via Watchtower or similar auto-update tools. Doing so may break the internal dependency chain and corrupt your environment.
This section explains the correct manual update procedure and how to resolve common issues — especially when containers fail to start or appear as “unhealthy.”
9.1 Recommended Update Workflow
When a new version of Nextcloud AIO becomes available, always perform the update manually using the local AIO web interface.
-
Access the AIO Interface
Open your standard Nextcloud AIO admin panel (the main web dashboard). From there, click on “Open Nextcloud AIO Interface.” This opens the local management page where you can stop, start, or recreate containers. -
Stop All Containers
In the AIO interface, click Stop Containers. This gracefully shuts down all AIO components (Nextcloud, Apache, Database, Redis, etc.) while keeping thenextcloud-aio-mastercontaineractive. -
Open Portainer
Log in to Portainer to review your Docker environment. -
Delete Stopped Containers — but not the Mastercontainer
In Portainer:Containers → StoppedSelect only the stopped containers belonging to Nextcloud AIO (for example
nextcloud-aio-apache,nextcloud-aio-db,nextcloud-aio-redis, etc.). Then click Remove to delete them. Critical Warning:
Never delete the container namednextcloud-aio-mastercontainer.
It is the brain of the AIO system — responsible for managing, creating, and updating every other container. Deleting it will remove orchestration metadata and can require a full manual rebuild. -
Recreate Containers
Return to the AIO interface and click Start Containers. Themastercontainerautomatically pulls updated images and recreates the other containers with the newest versions.
This process keeps all components synchronized and prevents version mismatch issues.
9.2 When Containers Don’t Start Properly
Sometimes, after an update, one or more containers (e.g. apache or nextcloud) may fail to start or show as “unhealthy.”
This often means the Docker image for that service was corrupted or downloaded incorrectly.
To fix it:
-
Stop all containers in the AIO interface.
-
In Portainer, delete all stopped containers (including the problematic one). But exclude `nextcloud-aio-mastercontainer. It must remain the only one running.
-
Open Images in Portainer and delete the corresponding image of the failed container. This forces Docker to re-download a fresh copy.
-
Return to the AIO interface and start the system again.
Docker will now fetch a clean image and rebuild the container. This reliably resolves “unhealthy” states caused by corrupted image layers.
9.3 Cleaning Up Old Images
After a successful update:
-
Go to Portainer → Images
-
Delete all unused or dangling Nextcloud-related images.
This frees disk space and keeps your environment tidy and efficient.
Summary
By following this procedure, you ensure:
-
Safe, manual upgrades without configuration loss
-
Controlled recreation of containers from verified images
-
Quick recovery from “unhealthy” states
-
Long-term stability of your Nextcloud AIO environment
This workflow has been thoroughly tested and proven reliable for maintaining production-grade Nextcloud AIO installations.
BONUS: Watchtower Configuration for Controlled Docker Updates
In many self-hosted environments, the Ubuntu server running Nextcloud AIO often also hosts other Docker containers — such as Bitwarden, Plex, Jellyfin, Audiobookshelf, or other services.
Manually updating each of these containers one by one can be time-consuming and inefficient.
This is where Watchtower becomes extremely useful — it can automatically detect, download, and update new Docker images in the background.
However, the Nextcloud AIO stack must never be updated this way, since it uses a dedicated internal update system.
That’s why Watchtower will be configured to update only containers that explicitly include a label allowing it, while ignoring everything else — including the AIO mastercontainer and its dependent services.
With this setup, you get a safe and automated update mechanism for all other containers on your server, while keeping your Nextcloud installation fully protected and under manual control.
10.1 Why Label-Based Updates Are Important
By default, Watchtower updates every container it can see — which is dangerous for complex setups.
Using the label-based control mechanism, Watchtower will only update containers that contain:
labels:
  - "com.centurylinklabs.watchtower.enable=true"
This makes it safe to run Watchtower alongside Nextcloud AIO — it will automatically maintain your supporting services such as NGINX Proxy Manager, Portainer, or Bitwarden, while completely skipping Nextcloud-related containers.
10.2 Directory Setup
First, create a dedicated directory for Watchtower to keep its configuration isolated:
mkdir ~/watchtower
cd ~/watchtower
10.3 Create the docker-compose.yml File
Now create the compose file:
nano docker-compose.yml
Paste the following content:
services:
  watchtower:
    image: nickfedor/watchtower:latest
    container_name: watchtower
    labels:
      - "com.centurylinklabs.watchtower.enable=true"
    volumes:
      - /var/run/docker.sock:/var/run/docker.sock
    environment:
      - TZ=Europe/Bratislava
      - WATCHTOWER_MONITOR_ONLY=false
      - WATCHTOWER_SCHEDULE=0 30 7 * * 3,6     # Run every Wednesday and Saturday at 07:30
      - WATCHTOWER_CLEANUP=true                # Remove old images after update
      - WATCHTOWER_LABEL_ENABLE=true           # Update only containers with this label
      - WATCHTOWER_NOTIFICATIONS=email
      - WATCHTOWER_NOTIFICATION_EMAIL_FROM=updates@mydomain.com
      - WATCHTOWER_NOTIFICATION_EMAIL_TO=admin@mydomain.com
      - WATCHTOWER_NOTIFICATION_EMAIL_SERVER=smtp.mydomain.com
      - WATCHTOWER_NOTIFICATION_EMAIL_SERVER_USER=updates@mydomain.com
      - WATCHTOWER_NOTIFICATION_EMAIL_SERVER_PASSWORD=SecurePassword2025
      - WATCHTOWER_NOTIFICATION_EMAIL_SERVER_PORT=465
      - WATCHTOWER_NOTIFICATION_EMAIL_SUBJECTTAG=Server Docker Updates
    restart: unless-stopped
Save and exit Nano (CTRL + O, Enter, CTRL + X).
10.4 Explanation of Configuration Parameters
| Parameter | Description |
|---|---|
| image | Official Watchtower image. |
| container_name | Name used to identify the container. |
| labels | Required for Watchtower to update itself safely. |
| /var/run/docker.sock | Allows Watchtower to monitor Docker daemon activity. |
| TZ | System timezone used for scheduling. |
| WATCHTOWER_MONITOR_ONLY | When set to true, Watchtower only reports updates (no action). |
| WATCHTOWER_SCHEDULE | CRON-style schedule — here: every Wednesday and Saturday at 07:30. |
| WATCHTOWER_CLEANUP | Automatically removes outdated Docker images. |
| WATCHTOWER_LABEL_ENABLE | Enables label filtering — only labeled containers get updated. |
| WATCHTOWER_NOTIFICATIONS | Enables notification output (email, Slack, etc.). |
| WATCHTOWER_NOTIFICATION_EMAIL_FROM / TO | Defines sender and recipient addresses for update emails. |
| WATCHTOWER_NOTIFICATION_EMAIL_SERVER* | SMTP configuration for your email server. |
| WATCHTOWER_NOTIFICATION_EMAIL_SUBJECTTAG | Adds a recognizable tag to the subject of update emails. |
10.5 Deploying Watchtower
Start the container:
docker compose up -d
Verify that it’s running:
docker ps | grep watchtower
10.6 How It Works
Once running, Watchtower will:
-
Check for image updates every Wednesday and Saturday at 07:30,
-
Automatically pull and redeploy containers that have the label
"com.centurylinklabs.watchtower.enable=true", -
Skip any container that doesn’t have this label (like Nextcloud AIO),
-
Clean up outdated images automatically,
-
Send a short email report after every update.
This configuration allows you to fully automate the maintenance of your Docker-based services — Bitwarden, Jellyfin, Plex, NGINX Proxy Manager, or Portainer — while ensuring that Nextcloud AIO remains untouched and stable.
Summary
Using Watchtower this way combines automation with control:
-
All your regular Docker containers stay updated automatically,
-
Nextcloud AIO remains safely excluded from the process,
-
You receive email reports for transparency,
-
And your overall maintenance time is reduced from hours to minutes.
It’s a clean, efficient, and safe solution for long-term server management.