
Prerequisites
- Linux Computer with USB Ports (optional SD Card Slot)
- micro SD Card with SD Adapter (with USB adapter if system doesn’t have SD Slot)
- USB Flash Drive
- Raspberry Pi connected to a video screen (usually HDMI)
Difficulty level: medium
Warnings/Notes
- The Flash Drive and the SD card must be 32GB or less
- FAT32 file system is limited to 32GB
- The Berryboot application is a GUI. So, it must be used with an HDMI TV/Monitor
- Do NOT untar the berryboot files from berryterminal until they are on the SD Card
- The
Install BerryBoot on micro SD Cardprocedure only needs to be performed once. It is performed to place the BerryBoot on aNEW SD Cardthat has aFAT32file system. When the NEW SD Card with BerryBoot Application is booted on the Raspberry Pi for the first time, it will partition the SD Card into two partitions:FAT32for the required BerryBoot application and a Linuxext4partition that holds the various Bootable images. After the first boot of the BerryBoot SD Card in the Raspberry Pi, the various Linux bootable images are either downloaded through the Network or imported from a USB Stick. The USB Stick method is used to import the NextCloudPi Linux image. Once it is imported from the USB Stick, it is stored in the Linuxext4Partition on the SD Card and the BerryBoot Menu is updated.
BerryBoot Instructions for NextCloudPi
1. Creating and copying NextCloudPi image to the USB Flash Drive:
- On a Linux System copy the following files (latest):
build-SD-berryboot.shscriptbuildlib.shscriptNextCloudPi_Rpi_xx-xx-xx.tar.bz2(xx-xx-xx = mm-dd-yy)
- Install
squashfs-toolsif it is not installed - Unzip, then Un-tar the
NextCloudPi_Rpi_xx-xx-xx.tar.bz2file - Run
build-SD-berryboot.sh NextCloudPi_Rpi_xx-xx-xx.tar.bz2 - Copy
NextCloudPi_Rpi_Berryboot_xx-xx-xx.imgto the USB Flash Drive - Eject the USB Flash Drive
2. Install BerryBoot on micro SD Card (Only needs to be performed once):
Note: Refer to https://www.berryterminal.com/doku.php/berryboot
- Download the proper Berryboot zip file for your Raspberry Pi from the website listed above
- Put the SD Card in your Linux System
- Wait for the SD Card to mount
- Verify that it is a FAT32 file system using
mount(should havetype vfatfor SD) - Copy the Berryboot zip to the SD Card
- CD to the SD Card
- Unzip the Berryboot zip file
- Remove the zip file (if you don’t the Raspberry Pi will error on boot)
cdto an alternate directory as to unmount the SD Cardumount(or eject) the SD Card- Put the SD Card in your Raspberry Pi.
- Start your Pi with a Keyboard and a Mouse connected
- Wait for the
Welcomescreen to appear (Berryboot installer):- Set Video
- Set Network Connection
- If network settings is correct, the proper Locale settings should be made. If not, select the proper Locale settings.
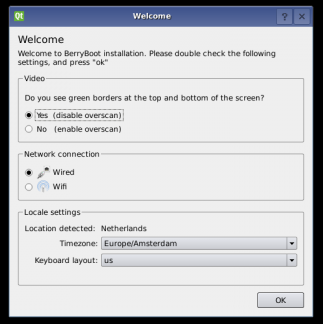
- If you selected a
Wirelessconnection:- Select Wireless Connection to use
- Provide password if needed
- Select ‘Ok’
- ‘Select destination drive’ screen:
- Select the SD Card (usually starts with
mmc) - Select File system (usually
ext4) - Click
Format
- Select the SD Card (usually starts with
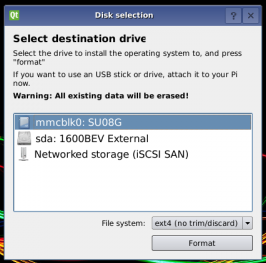
- It will now Re-partition the Berryboot SD Card and format it
- Select cancel on the
Add OSscreen - Wait for the Raspberry Pi to reboot after selecting “Ok” for reboot
- If the USB Flash Drive is already connected to a USB Port, continue to ‘Install the NextCloudPi on the SD Card’
3. Install the NextCloudPi on the SD Card:
- Connect the USB Flash Drive (with
NextCloudPi_Rpi_Berryboot_xx-xx-xx.img) to the Pi - Install the Berryboot SD Card from above
- Power on the Pi if it is off
- Wait for the
BerryBoot menu editorscreen to display - Click & HOLD the
Add OSbutton - Select
Copy OS from USB stick
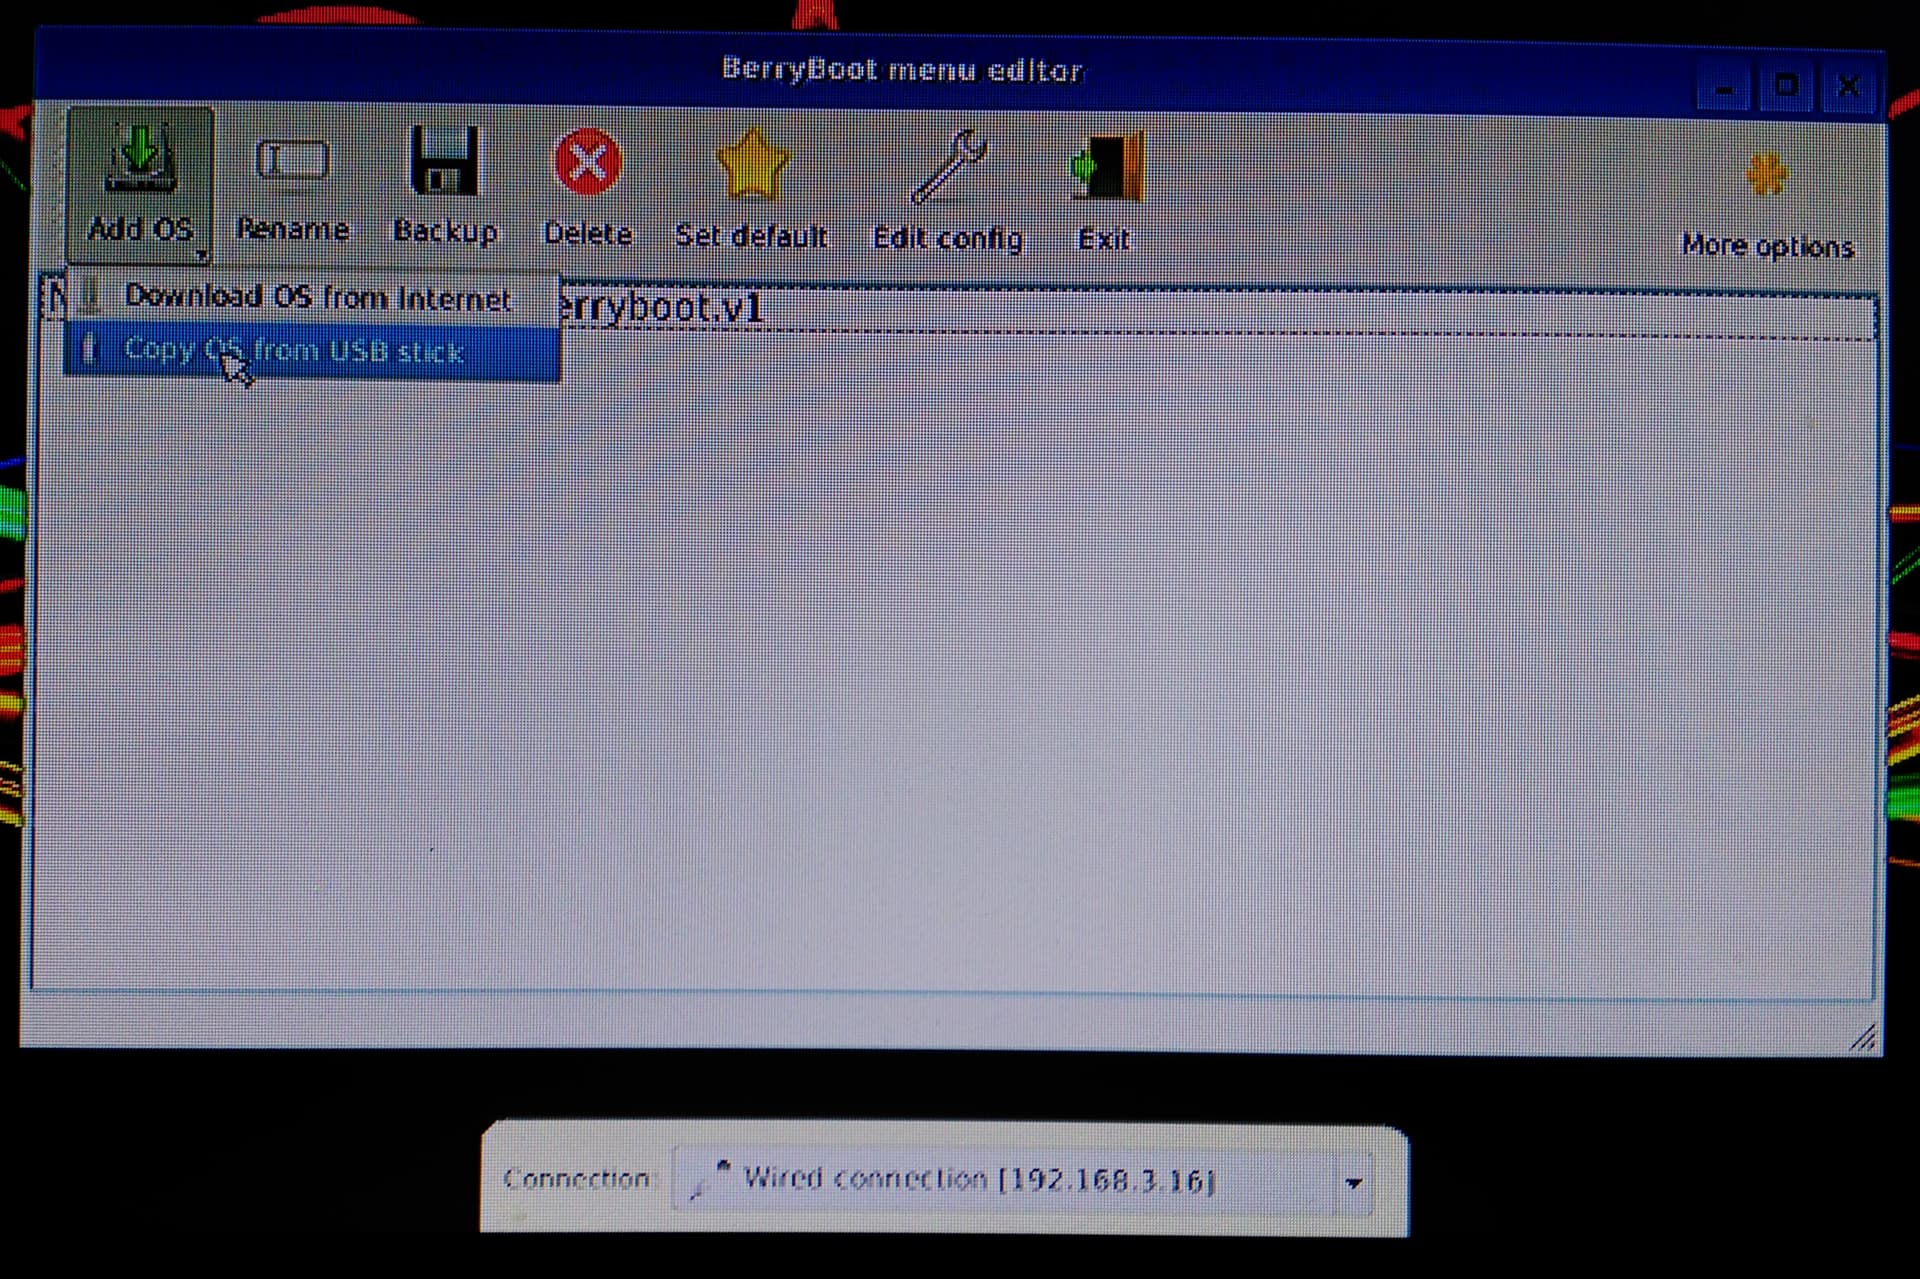
- The
Select image fileshould be displayed - Select the OS image to add to the SD Card it should be:
NextCloudPi_Rpi_Berryboot_xx-xx-xx.img - Click on
Open - Wait for it to copy the image to the micro SD Card
- To make it the default image to boot, select it and click on
Set Default - Click on
Exit - The Pi should reboot

- Start configuring and using your new NextCloudPi image.
We hope this doc was helpful, if you encounter any issues please reach out to the community.
These docs are written by volunteers, please consider becoming one of them.
Contact the wiki team at Matrix or Telegram