Installing NextcloudPi on Odroid HC4 for disaster relief team

Hi there,

my name is Gert Jan and I am a logistician for disaster relief team RescueNet. For our deployments we want to have a small server, on which we can share (patient) data, pictures, etc. It looks like Nextcloud would be awesome for this, especially because it should work offline and with chat function, a deck board etc as well.

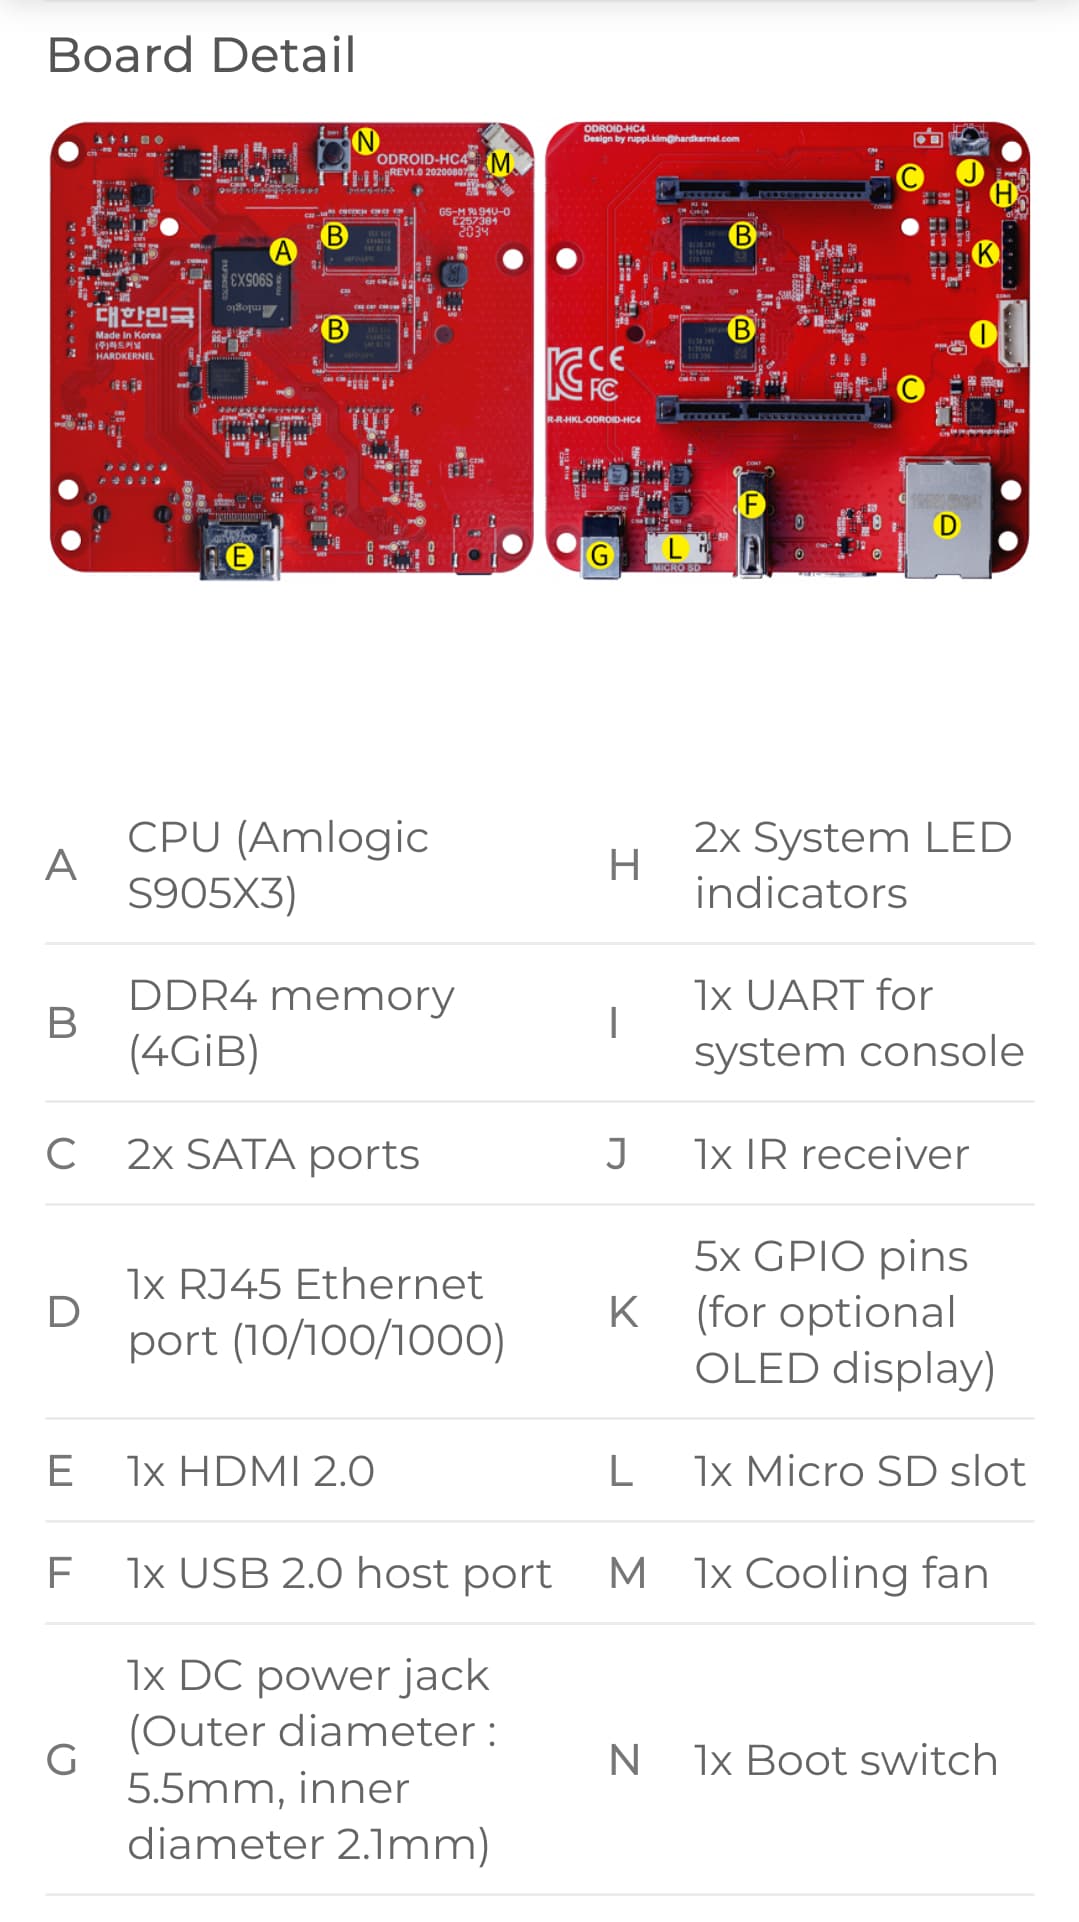
So therefore I bought an Odroid HC4, 250 gb Samsung SSD disc and a 16 gb UHC-I U3 Class 10 micro-sd card. I followed the instructions for installing, e.g. downloading nextcloudpi for hc4, sum check, writing the image to the sd card with balena etcher (used on Windows 10), etc. Now I have the Odriod connected with a red ‘power’ led and a flashing blue led and yellow flashes on the leds next to the UTP cable. In my router (Fritz!Box) I can see that the Odroid is connected and has an IP address.

However there I’m stuck, I cannot connect to it on https://nextcloudpi or https://nextcloudpi.local, nor on its IP address, it says ‘server not found’. And I am not as much a tech nerd as I would want to, so I actually have no idea where to continue from here…

Anyone that can point me in the right direction, or possibly even have a video call to get further?

Oh, and when it is all up and running we are looking for a way to have this Odroid also as a wifi access point, so that everyone in the team can connect in base camp directly without any other required equipment. Sounds like our ideal system :wink:

Thanx!
Gert Jan

I don’t have an Odroid board so it’s difficult to give easy directions but it seems you’ve picked a bit of a difficult board for this as it doesn’t have any native screen output connectors so you can easily troubleshoot with a monitor and keyboard.

Do you have the board connected to a monitor/screen on the GPIO?

https://wiki.odroid.com/odroid-hc4/application_note/application_note

You will need to access the board and see what is happening in the logs of the OS to know what is going on if it doesn’t work.

Have you considered using a RPi4 or something like that which has a connector for display output instead so you can troubleshoot things more easily?

Otherwise the people that are going to manage & maintain it will have to have a certain degree of technical skills to troubleshoot any issues (like you just encountered) or you will have to create such a setup for them that they can use in case it is needed.

Another point for a RPi4 or a similar device is because it’s much more recommended to use something that can more easily boot directly from the SSD rather than using an SD card for this, especially if you are going to use it with disaster relief, I’m guessing that you wish to have a certain degree of stability for the system after all?

The SD card is going to die rather quickly from all the writes that the server does, unless you properly configures it so it only boots using the SD card and all the write operations and data is located on the SSD. (This can also become a headache to troubleshoot if something goes wrong here)

The RPi4 also has a display output connector on the board which you can easily connect directly to a monitor and then connect keyboard & mouse for troubleshooting more easily than the Odroid board.

Hi ZendaiOwl,

thanx for your reply and thinking with me!

Yes, I did consider a RPi4 at first, but simply couldn’t find any available for sale… I thought an Odroid was very similar.

I do have an HDMI connector on the Odriod, though it doesn’t seem to display anything. Should I connect a display on the GPIO, and if so, should there be messages directly? I don’t know how to program anything on it since I can’t connect to it.

Hi fietserse,

Never seen an Odroid before but I would assume some visible output would be on a connected screen if a system is running. Also something must be working if your fritzbox sees a network device connected.

Make sure you have a screen (with the right input source selected :wink: ) and keyboard. Try to create the SD media again, sometimes the image could be decompressed with errors.

Alternatively try dietpi.com image as it worked for me many times in the past (with plenty of software available from the wizard).

As ZendaiOwl have said you must make sure all of your data is stored on the SSD and only system sits on the card. If you plan on storing ‘sensitive’ data you should make use of both SATA ports and have two drives in RAID. (https://www.youtube.com/watch?v=5Uh60qZMYrk)

You might have some hard time setting everithing up but I can assure you nextcloud is the best way. :slight_smile:

If you are having trouble with the odroid you can ask their support forum. They are very helpful.

Are you running armbian? If so, check out armbian-config

Also, see this much improved metal case for the HC4.

Just out of curiosity - do you know it the odroid has booted from the SSD or the micro-SD?

Ehm, I don’t know, but if I remove the SSD I will know for sure that it boots from SD, right? I could actually try that!

I registered on the Odroid forum but didn’t receive any confirmation emails, so no luck with registration :confused:

I’ve been asking around in my network if anyone has a spare RPi4, so maybe that would be the easier way. Can I easily attach the Sata SSD drive to the RPi? Do I need any specific cable for that?

The best (& ultimately the easiest) way is to use an external drive bay that provides power for the SSD and then you connect it to the RPi4 with a USB cable to one of the USB ports.

Having the RPi4 device power the drive is not recommended as it is a low-power device and isn’t great at providing power for HDD/SSD’s in a stable way during heavier load.

Depending on if the RPi4 is an older or newer one you may need to first boot it with an SD-card and configure it to boot from a mass-storage device, afterwards you can just flash the image directly to the SSD then connect it to the RPi4 & boot the device, if nothing went wrong in the configurations or when flashing the OS to the drive it will boot like normal, this is how my RPI4 is currently setup.

A newer RPi4 model B has this boot option enabled by default.

There is a couple more points that are important to note depending on what model you pick and how old it is, I’ve linked the documentation below.

Raspberry Pi Documentation

USB Mass Storage Boot

Note
Available on Raspberry Pi 2B v1.2, 3A+, 3B, 3B+, 4B, 400 and Zero 2 W, and Raspberry Pi Compute Module 3, 3+ and 4 only.

This page explains how to boot your Raspberry Pi from a USB mass storage device such as a flash drive or a USB hard disk. When attaching USB devices, particularly hard disks and SSDs, be mindful of their power requirements. If you wish to attach more than one SSD or hard disk to the Raspberry Pi, this normally requires external power - either a powered hard disk enclosure, or a powered USB hub. Note that models prior to the Raspberry Pi 4B have known issues which prevent booting with some USB devices.

Booting from USB Mass Storage

The procedure is the same as for SD cards - simply image the USB storage device with the operating system image.

After preparing the storage device, connect the drive to the Raspberry Pi and power up the Raspberry Pi, being aware of the extra USB power requirements of the external drive. After five to ten seconds, the Raspberry Pi should begin booting and show the rainbow splash screen on an attached display. Make sure that you do not have an SD card inserted in the Raspberry Pi, since if you do, it will boot from that first.

NVMe SSD Boot

NVMe (non-volatile memory express) is a standard for accessing solid state drives (SSDs) via a PCIe bus. You can connect these drives via the PCIe slot on a Compute Module 4 (CM4) IO board, allowing a CM4 to boot from SSD.

Would a powered USB hub + USB → Sata cable also work as well? Most external drive bays with external power input are ‘big’, the smaller the system the better for us :wink:

It should work, there are some known issues with using a USB hub connected to a boot drive for USB mass storage boot, see the raspberry pi forum post below

https://forums.raspberrypi.com/viewtopic.php?t=326374

I don’t know what you qualify as ‘big’ or not :smiley: but the external HDD I use is just a regular external HDD with its own power supply, similar to the model below but not this precise model, I couldn’t find the one I use because I don’t remember the model name but it is a Seagate 4TiB.

There are quite a lot of external drives with their own power supply that aren’t that much larger in size than some USB hubs, though of course there are USB hubs that are way smaller than most (or almost all) external HDD, you’ll just have to be careful & properly research how the hub functions and whether or not it’ll work to power the boot drive.

https://www.coolblue.nl/en/product/889276/seagate-expansion-portable-4tb.html

As long as you find a USB hub that doesn’t “back-powers” to the RPi4 as described in the forum post above it should work just fine but as I haven’t used a USB hub in this way I can’t say this for certain, you’ll have to look into it yourself to be sure.

The odroid hc4 includes built in dual 3.5" sata disk support over pci-e and a 4 Amp power supply. It literally kicks the pants off the pi4 and saves having to buy all those extra bits.

Either option works fine of course.

Cool, yes you’re right, I went looking at the HC4 board a bit more and he should be able to connect the SSD directly to one of the SATA connector ports (C) on the board and boot from that if it’s the model in the picture below

I did an Odroid HC4 installation yesterday and struggled at start. I was used to just pop in a sd-card in the board and turn it on to get it started, but not with this board.
After a long fight, I finaly connected a monitor to the board and saw that it booted into PetitBoot!

On https://www.armbian.com/odroid-hc4/ there’s some explanation to remove the petit boot loader. I attached also a keyboard to my odroid and used the console method:

# flash_eraseall /dev/mtd0
# flash_eraseall /dev/mtd1
# flash_eraseall /dev/mtd2
# flash_eraseall /dev/mtd3

After reboot, the devices is booting from the sd card.

An issue I have is that the SSD in the SATA port is not getting automounted. So, manual adding the mount-point to /mnt/fstab is necessary!

Hi all,

thanx so much for thinking along. We switched to raspberries now, we managed to find a few of them when asking friends! All model 4, 2 x 4Gb, 2 x 1 Gb. Not sure if the 1 Gb versions will work well, but at least we have a start. Seems the more convenient way to go.

Now we have to configure a wlan access point etc, working on that.

1 Like