How to move with Nextcloudpi from a Raspberry Pi to Proxmox

Hi all,

after hours of painful lessons I was successful and like to give something back to the community, as I could not find a proper tutorial on this so far.

So far I had NextcloudPi running on a Raspberry Pi 3b with an USB HDD attached, containing the files as well as the database.
I have started with Proxmox and wanted to move ncp on this too, for better performance and then also getting rid of the additional rpi.

Installation of ncp in a container works like a charm with just the single command from this site:
https://tteck.github.io/Proxmox/
There is also threads here about using the official LXD as LXC with for me not completely clear results (Making it possible: NextCloudPi LXD on Proxmox - #13 by michuvon), so I can only recommend the installation method behind the link.

After having the new ncp installation available, my main problem as a linux noob was to get my hdd with the files into the new installation.
These are the steps that got it working:

Plug in your usb drive into the proxmox host and have a look in proxmox about its name, for me it is /dev/sdb1, with BTRFS forma.

Open a console on your proxmox node.
Type

cd ..
cd mnt
mkdir myCloudDrive
mount /dev/sdb1 myCloudDrive

This has mounted the usb hdd into proxmox, you should be able to see its content in the folder /mnt/myCloudDrive.

To have that mount permanent (currently it would get lost with the next reboot), first do

blkid

and look for the UUID of your hdd. Copy that. Then do

nano /etc/fstab

and add a line at the end, exchange the UUID with the one from your hdd:

UUID=a36bb1d7-001b-93c91-d2b4-42afeabc8241 /mnt/myCloudDrive btrfs defaults 0 2

Reboot the computer and see if the drive is mounted as expected.

Now we make the mount available for the ncp container. For a BTRFS volume, you need to do this with the command line:

pct set 115 -mp0 /mnt/myCloudDrive,mp=/mnt/myCloudDrive

The number 115 is the ID of my ncp instance, exchange that with yours. This will make the mountpoint that we just created available in the ncp container under the same path (you can also change the second path of course).

Now open a console in the ncp container. Check if the mount point is there and if you can see the hdd files inside.
Now we need to tell nextcloud that this is the folder for the files:

nano /var/www/nextcloud/config/config.php

Look for the entry

 'datadirectory' => '/var/www/nextcloud/data',

and change that to

 'datadirectory' => '/mnt/myCloudDrive/ncdata',

Do the same a few lines below with the tmp path, exchanging the part before the tmp.

The temp directory also needs to be adjusted in the php.ini:

nano /etc/php/8.1/fpm/php.ini

About 17 pages down you find an entry for a temp path that points to the default path (/var/www/nextcloud/data/tmp), adjust that to the same temp path than in the config.php.

Reboot the container.
Log in to Nextcloud and check in settings→system that the USB hdd is considered as data directory.
Still the files are not displayed in the frontend, therefore in ncp-config (like before accessible also via https://:4443 execute nc-scan, afterwards the files should show up.

Done! :slight_smile:

You might have noticed that I did not use my previous database. I was only using nextcloud for files, no contacts/calendars and other staff so far that I would have needed to reimport, so I start with this from scratch. Somehow this could be taken over as well I guess, but I haven’t tried.
I cannot guarantee that some of the things could be done smarter as written above, so feel free to add if you know better, but at least this finally worked any can maybe be of help for someone else who also wants to move from a raspberry pi to proxmox.
5 Likes

Looks good. What do you think about joining our documentation team and submitting this for peer review at #ncpdrafts for publishing to our actual docs.

Thanks!
I am fine if this is being peer reviewed and taken over to the docs. However I personally feel like not having required time as well as knowledge to be part of the documentation team. I had a concrete issue and wanted to share the solution as help for others, but am not overall fiddling around with nextcloudpi as long as things work as I need them to.

@johndoe0815 thanks for the work and research.
The tutorial on moving to Proxmox, I wrote, back when I made the move from a Pi to PVE. Back then there was no LXC version, no Helper Script and Curl would not work in a Proxmox CT. I was not active for a wile and so all is a bit dated.
I hope to update it with your research you have done, if that is ok with you (I will credit you).

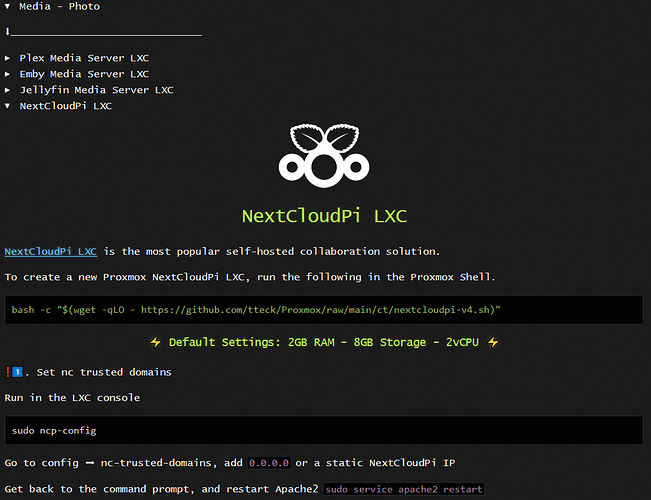
Just one question to you @johndoe0815 if I click the link to the helper script I just end up on a page that lists numerous scripts, can you let me know where exactly I can find the script you used? Thanks!
EDIT:// Ok, found it:
Media - Photo > NextCloudPi LXC

As the helper script is not part of the official NCP project, the basic question we need to ask is if this doc nevertheless belongs into the NCP Docs.
What do you thing @just @ZendaiOwl ?

I will update the Tutorial mentioned above, but should it also go into the official docs?

Yeah, why not? :slightly_smiling_face: We have references to outside sources in many articles so I see no reason why not

Thank you :pray:

Yes, you have already found it:

I think this is the script to do the NCP installation in the container that is being called:
https://raw.githubusercontent.com/nextcloud/nextcloudpi/master/install.sh

I did not have a closer look at it, but it worked perfectly for me, and is under GPL, so I think it makes sense to just take that over instead of reinventing the wheel.
This guy is doing a really great job of bringing more and more projects into Proxmox containers with just one single command, where manual installations are often still pretty painful if you are not a linux pro.

1 Like

I really like the concept/idea and think it would be good if we include it into the documentation. However, I would like the script to be reviewed by someone who understands it a bit better then myself. I did take the advice from DistroTube and just had a look at it but I can not understand how and where the script pulls the NCP image from.
So I’m not really comfortable to put that into the official documentation just yet.

1 Like

That I can help with.
This script is being called:
https://raw.githubusercontent.com/tteck/Proxmox/main/ct/nextcloudpi-v4.sh
Look close to its bottom, the main install command is
lxc-attach -n $CTID -- bash -c "$(wget -qLO - https://raw.githubusercontent.com/tteck/Proxmox/main/setup/$var_install.sh)" || exit

For $var_install look at the top, with the given variable this is “nextcloudpi-install”.
And with that you can complete the path, this is the install script:
https://raw.githubusercontent.com/tteck/Proxmox/main/setup/nextcloudpi-install.sh

And in this you see where it is loading NCP from:

msg_info "Installing NextCloudPi (Patience)"
curl -sSL https://raw.githubusercontent.com/nextcloud/nextcloudpi/master/install.sh | bash &>/dev/null
msg_ok "Installed NextCloudPi"

Looks official to me :slight_smile:

1 Like

thanks, I again learned something.
I did see the line at the bottom but did not understand how it works with the variable.

When skimming through the script I did not see any other strange stuff that would be downloaded, so I guess the script is safe to use.

Thank you for this fantastic write up. How is it working out for you? What sort of clients are you using to access your nextcloud? (e.g. browser, windows client, ios, Android…).

I am suffering from a botched move to a vm and am considering switching to a container based on this script. I’ll have to change my data directory like you did, and I’ve read some documentation that makes that process seem more involved than what you did.