Hi,
I just tested connecting SIP Trip Phone directly to the SIP provider and it works. So, you can skip installing Asterisk, and connect SIP Trip Phone directly to your SIP provider. I tested with Telnyx, but it should work with other SIP providers that allow direct connections from WebRTC applications. I describe below how to connect SIP Trip Phone directly to a Telnyx account.
First I want to point out that I don’t have any affiliation with any of the SIP providers that I mention. I just searched a lot to find the SIP provider offering the services with the best quality at the lowest prices possible. I found that Telnyx and Localphone are the best for voice SIP services.
How to connect SIP Trip Phone to a Telnyx account directly, without the use of Asterisk
1. Configure your Telnyx account.
After you sign up for a Telnyx account click on the ‘My Account’ icon in the upper right corner of the screen, then click on ‘My Account’, click the ‘Verifications’ tab and take the steps to undergo verification, so that you become ‘Level 1’ and ‘Level 2’ verified. ‘Level 1’ verification usually requires verifying the email address you used to create your Telnyx account, by clicking a link included in a message sent to that email address. ‘Level 2’ verification can be requested by pressing the ‘Verify’ button in the ‘Level 2 Verification’ section (on the ‘Verifications’ tab). After you make your request for ‘Level 2’ verification, a representative from Telnyx will look at your account details and (s)he may send you an email asking about the way you plan to use your Telnyx account, after which (s)he will approve the ‘Level 2’ verification. Being ‘Level 1’ and ‘Level 2’ verified unlocks all the features of a Telnyx account: you can buy numbers, assign a connection/messaging profile to a number, set up global messaging capabilities, create a multi-user organization, make international calls, set up call forwarding, send SMS messages at a higher rate.
While logged in to your Telnyx account, click on Numbers on the left panel. To buy a real phone number located in a country of your choice click on the ‘Search & Buy Numbers’ tab, then under ‘Local Numbers’, in the ‘Search Type’ select ‘Region’, in the ‘Region’ text field enter the name of the country, in the ‘Number Features’ select ‘Voice’, then, if you want your number to have other capabilities select other features such as ‘SMS’ from the drop-down list, then click on the ‘Search Numbers’ button. You will see a list with all the numbers available in the selected region. Choose the number that you like, click ‘Add to Cart’, then click on ‘Cart’ on the upper bar, then click on the ‘Place Order’ button.
After you have bought a local phone number click on ‘Numbers’ on the left panel; on the ‘My Numbers’ tab you will see your number in the list of acquired phone numbers.
Then click on SIP connections on the left panel, click on the ‘Add SIP Connection’ button, in the ‘Name’ field enter the name of the new SIP connection, for example SIP_Trip_Phone, then click on ‘Create SIP Connection’. After you create the new connection click on the small pencil icon to open the options window. On the options window, on the ‘BASIC’ tab, under ‘SIP Connection Type’ choose ‘Credentials’, then in the ‘Username’ field enter a username for this connection, siptripphoneuser for example, in the ‘Password’ field enter a strong password; write down the username and password to use them later. Next, under ‘AnchorSite’ choose a town that is closer to the physical location of your server, then, under ‘Expert Settings’, in the ‘Port’ drop-down list choose ‘rtcp-mux’. Next, click on the ‘INBOUND’ tab and in the ‘Number Format (DNIS)’ drop-down list choose ‘SIP Username’. (The last 2 settings are extremely important. If you connect SIP Trip Phone to Telnyx via Asterisk, the last 2 settings will be different, namely ‘Port’: ‘rtp+1’ and ‘Number Format (DNIS)’: ‘E.164’) Leave all the other settings as they are and click on the ‘Save All Changes’ button.
To be able to make phone calls you will also need to configure an Outbound Voice Profile. On the left panel click on ‘Outbound Voice Profile’, then click on the ‘Add New Profile’ button. In the ‘Name’ field enter a name for the profile, 1_outbound for example, then click ‘Create’. In the new window, under ‘Associated Connections and Applications’ click ‘Add connections/apps to profile’, select the name of the SIP connection created earlier, SIP_Trip_Phone in this example, by checking its checkbox, then click ‘Add Connections/Apps to profile’. Next, under ‘Traffic Type’ choose ‘Conversational’, then under ‘International Allowed Destinations’ select the countries and regions to which outbound calls will be allowed, by clicking their name. You can select all the 253 countries and regions, to allow outbound calls to all of them. Click on ‘Save’ to save the changes.
Next, create a Billing Group. Click on the ‘My Account’ icon in the upper right corner of the screen, then click on the ‘Billing Groups’ tab. In the ‘Create Billing Group’ field enter a name, Default_Billing for example, then click on ‘Create’. Then add the billing group to your phone number: click on ‘Numbers’ on the left panel, then on your number’s row, in the ‘Billing Group’ field select the billing group that you have just created, Default_Billing in this example. Also, in the ‘Connection or App’ field on the same row, choose the connection created earlier, SIP_Trip_Phone in this example.
2. Configure SIP Trip Phone
After you install SIP Trip Pphone like any other Nextcloud app, click on the profile picture in the upper right corner, click on ‘Settings’, then on the left sidebar, under ‘Personal’, click ‘SIP Trip Phone’. The credentials that have to be entered should look like this:
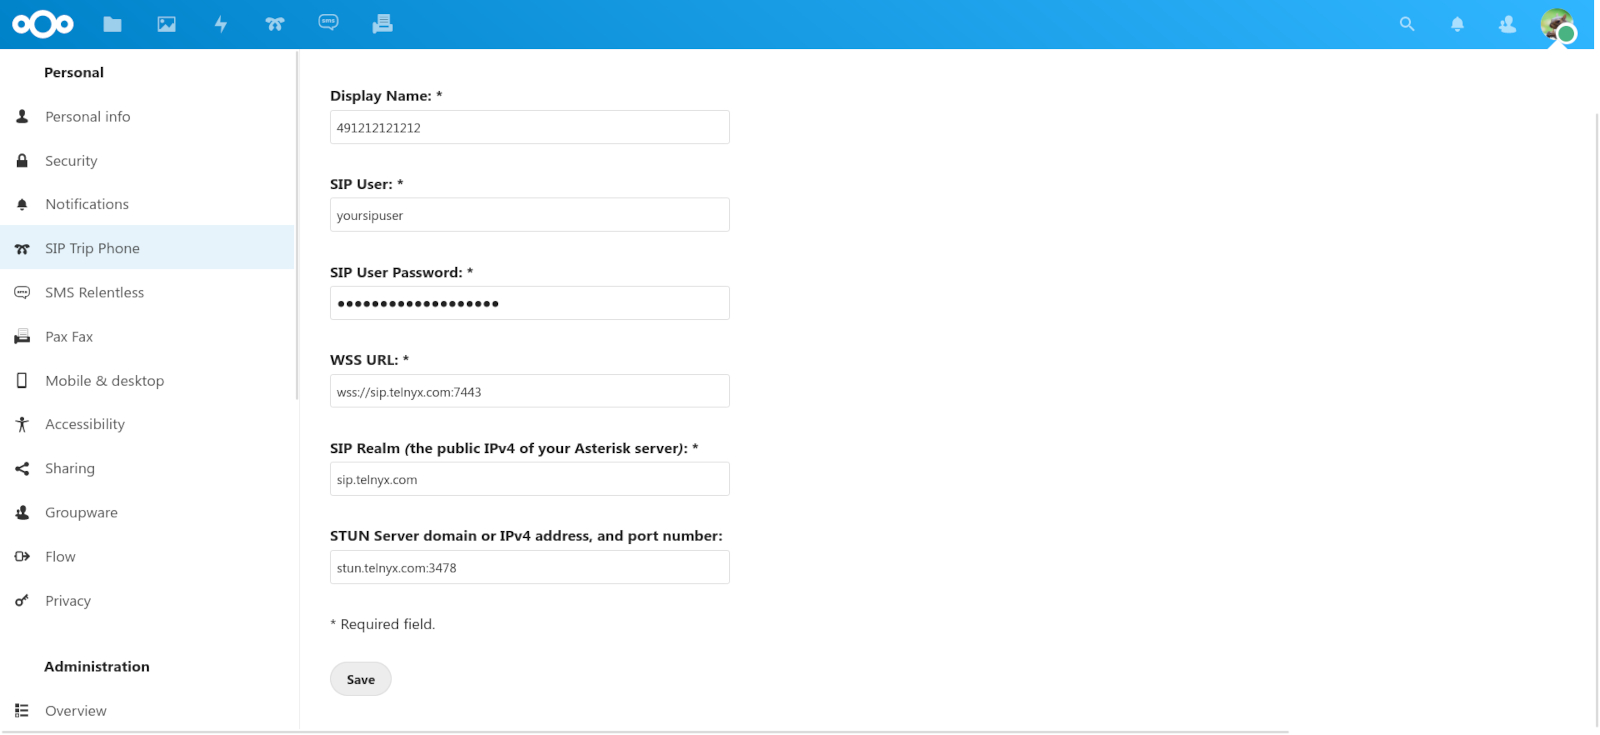
In the Display Name field you should enter the phone number that you have just configured in your Telnyx account, preceded by the country calling code: 49 for Germany, 33 for France, 44 for UK, 1 for USA, etc. So, if the number is 1212121212 and is located in Germany, the ‘Display Name’ shoiuld be 491212121212.
In the SIP User field enter the username for the SIP connection that you associated with your phone number in your Telnyx account, siptripphoneuserin this example. In the SIP User Password field enter the password for siptripphoneuser.
In the WSS URL field enter wss://sip.telnyx.com:7443
In the SIP Realm field enter sip.telnyx.com
In the STUN Server domain or IPv4 address, and port number field enter stun.telnyx.com:3478
Click ‘Save’ to save these settings.
3. Configure the web server
If you use Nginx (which I recommend), in the server blocks configuration file, /etc/nginx/sites-enabled/0-conf (replace 0-conf with the name of your file), add the following lines inside the server block for cloud.example.com, the subdomain that you use to serve Nextcloud, at the end of the block:
    location /apps/sip_trip_phone/phone {
        try_files $uri /index.html;
    }

    location /apps/sip_trip_phone/lib {

        # prevents 502 bad gateway error
        proxy_buffers 8 32k;
        proxy_buffer_size 64k;

        proxy_pass http://sip.telnyx.com:7443;
        proxy_set_header X-Real-IP $remote_addr;
        proxy_set_header Host $http_host;
        proxy_set_header X-Forwarded-For $proxy_add_x_forwarded_for;

        # enables WS support
        proxy_http_version 1.1;
        proxy_set_header Upgrade $http_upgrade;
        proxy_set_header Connection "upgrade";
    }
It is assumed that you use a subdomain like cloud.example.com to serve Nextcloud, and not a subdirectory, like example.com/nextcloud/ and that Nextcloud is served over HTTPS.
Restart Nginx:
systemctl restart nginx
If you use Apache (which I don’t recommend), add the following lines in the configuration file for Nextcloud, /etc/apache2/sites-available/nextcloud.conf (replace nextcloud.conf with the name of your file), inside the <VirtualHost *:443> block, at the end:
        <Directory /var/www/cloud.example.com/apps/sip_trip_phone/phone/>
             DirectoryIndex index.html
        </Directory>

	    <Location /var/www/cloud.example.com/apps/sip_trip_phone/lib/>

             ProxyPass http://sip.telnyx.com:7443
             ProxyPassReverse http://sip.telnyx.com:7443
             Order allow,deny
             Allow from all

             RequestHeader  set X-Real-IP $remote_addr
             RequestHeader  set Host $http_host
             RequestHeader  set X-Forwarded-For $proxy_add_x_forwarded_for

             RequestHeader  set Upgrade $http_upgrade
             RequestHeader  set Connection "upgrade"

	     </Location>
Enable the necessary Apache modules:
a2enmod rewrite headers env dir mime setenvif ssl proxy proxy_fcgi
Restart Apache:
systemctl restart apache2
If a SIP provider allows direct connections from web applications using SIP over WebSocket, they should list the settings needed for connection on their website. Telnyx lists these settings at the bottom of this page.
As a side note, Localphone, Vonage, Flowroute, Twilio don’t seem to allow direct connections from web applications using SIP over WebSocket, like SIP Trip Phone, they can only connect via Asterisk.