Can't make reverse proxy work between public Apache server and local Nextcloud server

The Basics

  • Nextcloud Server version:
    • Nextcloud AIO v10.11.10
  • Operating system and version:
    • Debian 12 / Centos 7
  • Reverse proxy and version:
    • Apache
  • Installation method:
    • Docker AIO

Summary of the issue you are facing:

With docker I’ve managed to install Nextcloud_AIO, with almost no problems. This runs on a Debian host, connected to my local network (192.168.1.179).

I have a public web server (Apache) running without problems on a Centos 7 host, also connected to the local network.

I now want to use the public web server as reverse proxy, forwarding requests for “nextcloud.mydomain.dk” to the Debian host. I’ve followed the recommendations here, but can’t make it work.

In a browser, opening https://192.168.1.179:8080/ works flawlessly.

But trying to open https://nextcloud.mydomain.dk/ in a browser results in “This site can’t provide a secure connection” and “ERR_SSL_PROTOCOL_ERROR”

From another host on the local network, I can connect with curl to https://nextcloud.mydomain.dk/login, this works with no error, selecting TLSv1.3

So I guess this is some kind of certificate / TLS problem?

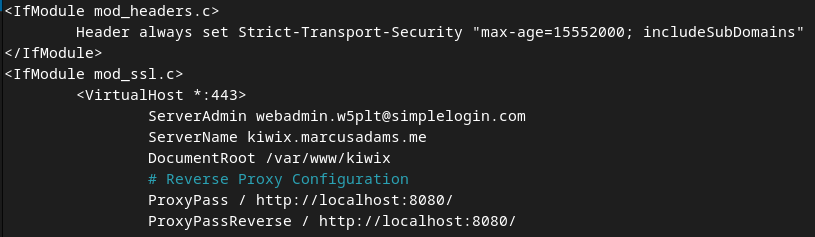
Below is my configuration of the proxy in Apache’s httpd.conf. I had to remove TLSv1.3 from the list of SSLProtocols in order to make Apache accept the configuration.

<VirtualHost *:80>
    ServerName nextcloud.mydomain.dk
    RewriteEngine On
    RewriteCond %{HTTPS} off
    RewriteRule (.*) https://%{HTTP_HOST}%{REQUEST_URI}
    RewriteCond %{SERVER_NAME} nextcloud.mydomain.dk
    RewriteRule ^ https://%{SERVER_NAME}%{REQUEST_URI} [END,NE,R=permanent]
</VirtualHost>

<VirtualHost *:443>
    ServerName nextcloud.mydomain.dk

    # Reverse proxy based on https://httpd.apache.org/docs/current/mod/mod_proxy_wstunnel.html
    RewriteEngine On
    ProxyPreserveHost On
    RequestHeader set X-Real-IP %{REMOTE_ADDR}s
    AllowEncodedSlashes NoDecode
    
    # Adjust the two lines below to match APACHE_PORT and APACHE_IP_BINDING. See https://github.com/nextcloud/all-in-one/blob/main/reverse-proxy.md#adapting-the-sample-web-server-configurations-below
    ProxyPass / http://192.168.1.179:11000/ nocanon
    ProxyPassReverse / http://192.168.1.179:11000/
    
    RewriteCond %{HTTP:Upgrade} websocket [NC]
    RewriteCond %{HTTP:Connection} upgrade [NC]
    RewriteCond %{THE_REQUEST} "^[a-zA-Z]+ /(.*) HTTP/\d+(\.\d+)?$"
#    RewriteRule .? "ws://192.168.1.179:11000/%1" [P,L,UnsafeAllow3F] # Adjust to match APACHE_PORT and APACHE_IP_BINDING. See https://github.com/nextcloud/all-in-one/blob/main/reverse-proxy.md#adapting-the-sample-web-server-configurations-below
    RewriteRule .? "ws://192.168.1.179:11000/%1" [P,L] # Adjust to match APACHE_PORT and APACHE_IP_BINDING. See https://github.com/nextcloud/all-in-one/blob/main/reverse-proxy.md#adapting-the-sample-web-server-configurations-below

    # Enable h2, h2c and http1.1
#    Protocols h2 h2c http/1.1
    
    # Solves slow upload speeds caused by http2
#    H2WindowSize 5242880

    # TLS
    SSLEngine               on
#    SSLProtocol             -all +TLSv1.2 +TLSv1.3
    SSLProtocol             -all +TLSv1.2
    SSLCipherSuite          ECDHE-ECDSA-AES128-GCM-SHA256:ECDHE-RSA-AES128-GCM-SHA256:ECDHE-ECDSA-AES256-GCM-SHA384:ECDHE-RSA-AES256-GCM-SHA384:ECDHE-ECDSA-CHACHA20-POLY1305:ECDHE-RSA-CHACHA20-POLY1305:DHE-RSA-AES128-GCM-SHA256:DHE-RSA-AES256-GCM-SHA384:DHE-RSA-CHACHA20-POLY1305
    SSLHonorCipherOrder     off
    SSLSessionTickets       off

    # If running apache on a subdomain (eg. nextcloud.example.com) of a domain that already has an wildcard ssl certificate from certbot on this machine, 
    # the <your-nc-domain> in the below lines should be replaced with just the domain (eg. example.com), not the subdomain. 
    # In this case the subdomain should already be secured without additional actions
    SSLCertificateFile /etc/dehydrated/certs/mydomain.dk/fullchain.pem
    SSLCertificateKeyFile /etc/dehydrated/certs/mydomain.dk/privkey.pem

    # Disable HTTP TRACE method.
    TraceEnable off
    <Files ".ht*">
        Require all denied
    </Files>

    # Support big file uploads
    LimitRequestBody 0
    Timeout 86400
    ProxyTimeout 86400
</VirtualHost>

Hey again :wave:

Just wanted to follow up, since I’ve seen both of your threads – and to be honest, you’re overcomplicating things with Apache.
It can work, sure, but:

  • Apache is not the easiest tool for managing reverse proxies.
  • You have to manually deal with SSL certificates, HTTPS redirection, proxy headers, and more.
  • It’s definitely not user-friendly, especially when working with Docker-based apps like Nextcloud AIO.

In your first topic, I already shared the setup I use at home for ~15 services – and it’s working great:

  • One NGINX Proxy Server (NGINX Proxy Manager) running on a separate local machine.
  • All subdomains are routed through it to the right internal IPs and ports.
  • SSL is handled automatically with Let’s Encrypt.
  • You configure everything via a simple web interface – no editing config files.

So just to be clear – in both topics, you’re really solving the same problem.
But with NGINX Proxy Manager, you avoid 95% of the complexity you’re now facing with Apache.

If you’re doing this for the long term, I’d highly recommend sticking to the simpler, cleaner solution.

Hello @vawaver , thanks a lot for your recommendations. Your setup seems to be a good way forward for me also. Is this what I need to do?

  1. Setup a new host, e.g. proxy.mydomain.dk, based on the docker image you refer to. My router should direct all traffic on port 80 and port 443 to this new host.
  2. Of course remove any reverse proxy’ing from my existing Apache host. But apart from this, just keep it as it is.
  3. Setup proxy.mydomain.dk to forward requests for mydomain.dk to the existing Apache host.
  4. Install the Nextcloud-AIO docker image on a separate host, following this all-in-one/reverse-proxy.md at main · nextcloud/all-in-one · GitHub
  5. Setup proxy.mydomain.dk to forward requests for nextcloud.mydomain.dk to the Nextcloud-host

I should mention that quite a few people are dependent on the services from my existing Apache host. So obviously, I’m a bit concerned about the risks involved in changing to the new setup with a Nginx proxy server.

With my present setup, the Apache host has valid certificates for mydomain.dk and a few other domains. Should these be removed?

Thanks,
Jesper

Hi Jesper,

Yes, your understanding is mostly correct and you’re definitely heading in the right direction. Let me clarify a few points:


:wrench: How the setup works:

  1. Run NGINX Proxy Manager in Docker – either on a new host or on an existing machine you already have, as long as it has Docker installed and is accessible within your LAN.
    There’s no need to set up a brand new dedicated server just for the proxy if you already have one that fits.

  2. Forward ports 80 and 443 on your router to the machine running NGINX Proxy Manager.
    This ensures that all incoming traffic (e.g. for nextcloud.mydomain.dk, mydomain.dk) goes through your proxy first.

  3. Disable any reverse proxy setup on your Apache host – that part will no longer be needed. Apache can continue serving your websites or apps, but access will now go through the NGINX proxy.

  4. In NGINX Proxy Manager, configure:

    • mydomain.dk → points to the internal IP of your Apache host (e.g. 192.168.1.100:80)
    • nextcloud.mydomain.dk → points to the IP and port of your Nextcloud AIO host (e.g. 192.168.1.101:11000)
  5. Install Nextcloud AIO following my setting for docker-compose.yml
    Remember: Nextcloud AIO uses port 11000 for Nextcloud Apache, which you’ll need to use in the proxy config. But port 6789 is for Nextcloud Admin web interface.

:paperclip: Helpful links

I shared my full setup (including docker-compose.yml, port configuration, and routing) here:
:link: My working solution using NGINX Proxy Manager

And here’s a short video showing it in action:
:movie_camera: Video demo of the setup


:closed_lock_with_key: About existing SSL certificates

You won’t need the certificates that are currently configured on your Apache server anymore – NGINX Proxy Manager will handle all SSL certificates using Let’s Encrypt.
You can leave them in place as backup, but they’ll no longer be used.


:lock: Security note

I strongly recommend NOT exposing the NGINX Proxy Manager web UI directly to the internet.
Instead, access it:

  • only from your local network, or
  • via a VPN like WireGuard if you need remote access.

Your public services like Nextcloud can be safely exposed via HTTPS through the proxy, but the proxy admin interface should remain protected.


Let me know if you run into anything. I’ve been running this setup for a long time with over 15 self-hosted services – rock solid and easy to manage.

1 Like

Thanks again, @vawaver :slightly_smiling_face:

One more question - I also host a mail server, and this also needs certificates. Right now, the Apache server mentioned above also handles mails to and from mydomain.dk, and needs TLS/SSL for this.

So, I must in some way copy the certificates generated by the Nginx Proxy to the machine with the mail server?

Hi Jesper,

Great question – I actually have a very similar setup, where my mail server runs on a separate VM in the LAN, and the NGINX Proxy Manager runs on another VM, also within the same network.


:white_check_mark: Here’s how I handle SSL for the mail server:

  • NGINX Proxy Manager is responsible for generating all Let’s Encrypt certificates, including the one used for the mail service domain (e.g. mail.example.com).
  • Every day at midnight, I run a simple script on the NGINX server that:
    • Locates the latest fullchain.pem and privkey.pem files from the correct NGINX certificate directory (based on the internal cert ID, like npm-29).
    • Copies those files over via SSH (scp) to the mail server.
  • On the mail server, I have a bind mount configured in /etc/fstab so that the mail server’s mail software can read the static certificate files from a known path (e.g. /DOCKER-DATA/certs/).

:hammer_and_wrench: Mail server config

  • The mail server is configured to use those copied certs for SMTP, IMAP, and other secure protocols.
  • The web-based HTTPS access to the mail interface (if any) is still handled through NGINX Proxy Manager, with its own reverse proxy config.

:pushpin: A few notes:

  • If NGINX generates a new certificate with a different internal ID (npm-30, etc.), I just update that path in the script.
  • You could automate detection of the correct certificate folder too, but I keep it static for simplicity.
  • This method works well if your mail server is not publicly exposed and you don’t want to run Certbot or acme.sh on it.

Let me know if you’d like an example of the copy script or crontab line – it’s a clean and reliable setup that keeps your certificates centralized and your mail stack secure.

1 Like

@vawaver heads up for great explaining… where were you when I started my homelab :star_struck:

NPM allows setting up a stream to allow pass-through for servers running Certbot/acme.sh

Hey @scubamuc,

I’m not an IT professional :mechanic:. Everything I’ve figured out so far is just the result of wanting to build and run my own homelab :house::desktop_computer:.
Over time I added more services – storage, media, mail, web apps – and I want to keep full control over everything. No Microsoft, no Google – just selfhosted solutions I actually trust :shield:.

This setup with NGINX Proxy Manager and centralized cert handling simply works for what I need :white_check_mark:. The mail server doesn’t need to be exposed to the internet :globe_with_meridians:, and this way I avoid running Certbot or acme.sh there at all.

You’re right about the stream feature in NPM – that’s definitely a valid option for forwarding traffic directly to backend services like SMTP/IMAP :satellite:, or for handling cert challenges for other machines :lock:. I just prefer keeping it simple and predictable with daily sync :clock12::file_folder:.

Homelab is a constant learning process :repeat:. Every little thing you build ends up teaching you five more :jigsaw:.

1 Like

Maybe this will work for sharing the letsencrypt certificates.

name: nginx-proxy-manager

services:
   app:
      image: 'jc21/nginx-proxy-manager:latest'
      restart: unless-stopped
      ports: 
         - '80:80'
         - '81:81'
         - '443:443'
      volumes:
         - type: volume
           source: data
           target: /data
         - type: bind
           source: ./letsencrypt
           target: /etc/letsencrypt

volumes:
   data:

With this compose file I should be able to easily copy the letsencrypt certificates from within the docker container to another machine.

2 Likes

Yes, please, I would like to receive a copy of your copy script :slightly_smiling_face:

As I understand it, my router should forward all traffic for ports 143 (imap), 993 (imaps), 110 (pop), 995 (pops), 25, 465 and 587 (smtp) to the mail-server. Only 80 and 443 should be forwarded to the Nginx proxy.

You’re understanding it correctly – only ports 80 and 443 should be forwarded to the NGINX proxy server (for web traffic).
All the mail-related ports (25, 465, 587, 110, 995, 143, 993) should go directly to your mail server.

Here’s the script I use to copy the certificate files from the NGINX server to the mail server once a day.
It’s triggered by a cron job running as root at midnight, so I don’t have to deal with permission issues on the destination:

#!/bin/bash

# Function to find the newest matching file by pattern
newest_file_matching_pattern(){
    find $1 -name "$2" -print0 | xargs -0 ls -1 -t | head -1
}

# Set the cert folder (replace the number with your actual certificate folder in NPM)
CERT_FOLDER="/home/youruser/nginx/letsencrypt/archive/npm-29/"

FULLCHAIN=$(newest_file_matching_pattern $CERT_FOLDER "fullchain*")
PRIVKEY=$(newest_file_matching_pattern $CERT_FOLDER "privkey*")

# Copy the certs to the mail server (adjust IP, username and destination path)
scp "$FULLCHAIN" youruser@mail-server:/home/youruser/certs/cert.pem
scp "$PRIVKEY" youruser@mail-server:/home/youruser/certs/key.pem

Crontab entry (as root):

0 0 * * * /path/to/copy_mail_ssh.sh

:mag_right: Why the renaming?

NGINX Proxy Manager stores certificates with numeric suffixes (like fullchain3.pem, privkey3.pem, etc.), and the file names change each time the cert is renewed.

Most mail servers (e.g. Postfix, Dovecot) expect fixed file names like cert.pem and key.pem.
So when copying the latest version, I rename them during transfer to make sure the mail services always use the correct cert without needing to reconfigure anything after each renewal.


:camera_flash: Additional info

  • I attached a screenshot showing how to identify the correct certificate folder (e.g. npm-29) inside the NGINX Proxy Manager’s letsencrypt/archive/ directory.
  • Also include a screenshot of how I’ve set up the mail domain in NGINX Proxy Manager, so you can see exactly how the routing is configured.

:paperclip: Optional follow-up: /etc/fstab entry on the mail server (bind mount)

This section is a continuation of the previous script that copies the SSL certificates from the NGINX Proxy Manager to the mail server.
It’s an optional step, but a very practical one if you want to:

  • ensure your mail services always have a stable, fixed path to the certs,
  • avoid dealing with manual file moves, symlinks, or permission issues between users.

This exact setup is based on my Mailu server, but you can adapt it to your own server layout and file structure.


To enable the mail server to always access the certificates from a known location, add the following line to /etc/fstab:

# Bind mount for certificate access
# This ensures that /home/youruser/certs (where certs are copied via SCP)
# becomes available at /DOCKER-DATA/certs (which is used by Postfix or Dovecot)
#
# Source:     /home/youruser/certs     – the destination path used in the SCP script
# Target:     /DOCKER-DATA/certs       – the path expected by your mail server config
# Type:       none                     – since it's a bind mount, not a device
# Options:    defaults,bind            – standard mount options + bind for linking directories
# Dump:       0                        – no backup
# Pass:       0                        – no fsck check on boot

/home/youruser/certs /DOCKER-DATA/certs none defaults,bind 0 0

You can activate the mount immediately without rebooting:

mount /DOCKER-DATA/certs

This way, your mail services (e.g. Postfix, Dovecot) always have access to the current certificate files via a consistent path, with no need to manage file permissions or move anything manually after each update.

1 Like

Thanks again @vawaver , I think I’ve got most of it working now :slight_smile:

2 Likes