I do the same: Open 80 and 443, point them exclusivley to one ip, redirect permanent in http vhost and HSTS enabled. Zero securityimpact if you ask me.
It’s one more attack point for an intruder. Redirects also allow traffic to be sent unencrypted to the server, then forwarded after, potentially offering data should a MitM attack happen.
I have 80 open on my network, however it goes to a placeholder page to avoid the error (validating the address) but pretty useless for anything until https:// is added.
Good habit to get into IMO.
Not applicable for end users IMO.
Thanks for the info. I agree that it’s a good habit to get into but it’s basically impossible to explain to non technical people who don’t understand the difference.
Looks like I have more research to do, weighing the security benefits versus the convenience.
Ah yes, like passwords on phones or closing the windows when you leave the house. Such an inconvenience until something bad happens.
It’s probably fine, but it’s your security you’re risking for the sake of asking end-users to type 7 characters one time (given Chrome, FF and others will remember the URL after that)
Trying to remove Nextcloud just so that I can change the data path is becoming a nightmare ![]()
I removed the database as follows:
mysql –u root –p
show databases;
drop database nextcloud;
exit;
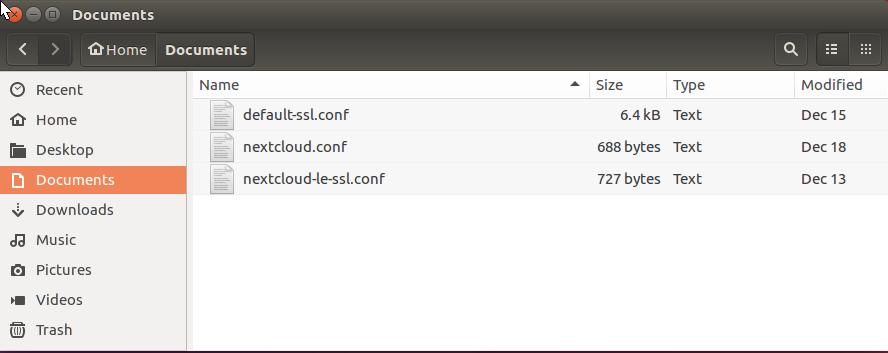
I then made backups of:
- default-ssl.conf
- nextcloud.conf
- nextcloud-le-ssl.conf
I then deleted the folder /var/www/html/nextcloud
I then re-installed nextcloud as follows:
wget https://download.nextcloud.com/server/releases/nextcloud-12.0.4.zip
unzip nextcloud-12.0.4.zip
sudo mv nextcloud /var/www/html
sudo chown -R www-data:www-data /var/www/html/nextcloud
I then configured the database:
mysql –u root –p
GRANT ALL PRIVILEGES ON nextcloud.* TO ‘nextcloud’@‘localhost’ IDENTIFIED BY ‘{password}’;
FLUSH PRIVILEGES;
exit;
When I enter my IP address 192.168.1.136 in the web browser it says “This site can’t be reached. 192.168.1.136 refused to connect.” In fact when I enter my IP address in my default web browser (Chrome) it always changes it to https://192.168.1.136 so I have to use a different browser such as Firefox or Safari so that it doesn’t change it to https.
When I run:
sudo apache2ctl configtest
I get the error:
apache2: Syntax error on line 219 of /etc/apache2/apache2.conf: Could not open configuration file /etc/apache2/sites-enabled/nextcloud-le-ssl.conf: No such file or directory
Action 'configtest' failed.
The Apache error log may have more information.
So I tried to copy the backup I made of nextcloud-le-ssl.conf into /etc/apache2/sites-enabled/ but I get the error:
cp: not writing through dangling symlink ‘/etc/apache2/sites-enabled/nextcloud-le-ssl.conf’
I am making a right mess of this, it was all working until I wanted to change the data path which require re-installation of Nextcloud !
The installation of Nextcloud and implementation of HTTPS took 42 steps and I am unsure which of them I need to repeat when re-installing Nextcloud. I recorded my installation procedure which is shown below:
Nextcloud installation:
1 sudo apt-get update
2 sudo apt-get install lamp-server^
3 sudo apt-get install libapache2-mod-php7.0 php7.0-mbstring php7.0-curl php7.0-zip php7.0-gd php7.0-mysql php7.0-mcrypt
4 sudo apt-get install php-xml
5 wget https://download.nextcloud.com/server/releases/nextcloud-12.0.4.zip
6 unzip nextcloud-12.0.4.zip
7 sudo mv nextcloud /var/www/html
8 sudo chown -R www-data:www-data /var/www/html/nextcloud
9 mysql_secure_installation
10 mysql –u root –p
11 CREATE DATABASE nextcloud;
12 GRANT ALL PRIVILEGES ON nextcloud.* TO ‘nextcloud’@‘localhost’ IDENTIFIED BY ‘{password}’;
13 FLUSH PRIVILEGES;
14 exit;
15 sudo nano /etc/mysql/my.cnf
16 Add the following lines to the end of my.cnf…
log-bin=/var/log/mysql/mariadb-bin
log-bin-index=/var/log/mysql/mariadb-bin.index
binlog_format=mixed
17 sudo a2enmod rewrite
18 service apache2 restart
19 sudo touch /etc/apache2/sites-available/nextcloud.conf
20 sudo ln -s /etc/apache2/sites-available/nextcloud.conf /etc/apache2/sites-enabled/nextcloud.conf
21 sudo nano /etc/apache2/sites-available/nextcloud.conf
22 Add the following lines to nextcloud.conf…
<VirtualHost *:80>
ServerAdmin admin@ubuntu
DocumentRoot "/var/www/html/nextcloud/"
ServerName 192.168.1.136
ServerAlias ubuntu
<Directory "/var/www/html/nextcloud/">
Options FollowSymLinks
AllowOverride All
Order allow,deny
allow from all
 </Directory>
ErrorLog /var/log/apache2/your-domain.com-error_log
CustomLog /var/log/apache2/your-domain.com-access_log common
</VirtualHost>
23 /etc/init.d/apache2 restart
24 sudo nano /var/www/html/nextcloud/config/config.php
25 Add trusted domains to config.php…
 'trusted_domains' =>
  array (
    0 => '192.168.1.136',
'xxxxxxxx.dynu.net',
  ),
HTTP to HTTPS
26 sudo openssl req -x509 -nodes -days 365 -newkey rsa:2048 -keyout /etc/ssl/private/apache-selfsigned.key -out /etc/ssl/certs/apache-selfsigned.crt
27 Enter certificate details…
Country Name (2 letter code) [AU]:
State or Province Name (full name) [Some-State]:
Locality Name (eg, city) :
Organization Name (eg, company) [Internet Widgits Pty Ltd]:
Organizational Unit Name (eg, section) :
Common Name (e.g. server FQDN or YOUR name) :
Email Address :
28 sudo openssl dhparam -out /etc/ssl/certs/dhparam.pem 2048
29 sudo nano /etc/apache2/conf-available/ssl-params.conf
30 Copy the following lines to ssl-params.conf
# from https://cipherli.st/
# and https://raymii.org/s/tutorials/Strong_SSL_Security_On_Apache2.html
SSLCipherSuite EECDH+AESGCM:EDH+AESGCM:AES256+EECDH:AES256+EDH
SSLProtocol All -SSLv2 -SSLv3
SSLHonorCipherOrder On
# Disable preloading HSTS for now.  You can use the commented out header line that includes
# the "preload" directive if you understand the implications.
#Header always set Strict-Transport-Security "max-age=63072000; includeSubdomains; preload"
Header `always` set Strict-Transport-Security "max-age=63072000; includeSubdomains"
Header always set X-Frame-Options DENY
Header always set X-Content-Type-Options nosniff
# Requires Apache >= 2.4
SSLCompression off
SSLSessionTickets Off
SSLUseStapling on
SSLStaplingCache "shmcb:logs/stapling-cache(150000)"
SSLOpenSSLConfCmd DHParameters "/etc/ssl/certs/dhparam.pem"
31 sudo cp /etc/apache2/sites-available/default-ssl.conf /etc/apache2/sites-available/default-ssl.conf.bak
32 sudo nano /etc/apache2/sites-available/default-ssl.conf
33 Set ServerAdmin email address, ServerName, adjust the SSL directives to point to certificate & key files…
<IfModule mod_ssl.c>
        <VirtualHost _default_:443>
                ServerAdmin xxxxxxx
                ServerName xxxxxxxx.dynu.net
                DocumentRoot /var/www/html
                ErrorLog ${APACHE_LOG_DIR}/error.log
                CustomLog ${APACHE_LOG_DIR}/access.log combined
                SSLEngine on
                SSLCertificateFile      /etc/ssl/certs/apache-selfsigned.crt
                SSLCertificateKeyFile /etc/ssl/private/apache-selfsigned.key
                <FilesMatch "\.(cgi|shtml|phtml|php)$">
                                SSLOptions +StdEnvVars
                </FilesMatch>
                <Directory /usr/lib/cgi-bin>
                                SSLOptions +StdEnvVars
                </Directory>
                BrowserMatch "MSIE [2-6]" \
                               nokeepalive ssl-unclean-shutdown \
                               downgrade-1.0 force-response-1.0
        </VirtualHost>
</IfModule>
34 sudo nano /etc/apache2/sites-available/000-default.conf
35 Add redirect…
<VirtualHost *:80>
        . . .
        Redirect "/" "https://xxxxxxxx.dynu.net/"
        . . .
</VirtualHost>
36 sudo ufw allow ‘Apache Full’
37 sudo a2enmod ssl
38 sudo a2enmod headers
39 sudo a2ensite default-ssl
40 sudo a2enconf ssl-params
41 sudo apache2ctl configtest
42 If everything is successful you will get this result…
AH00558: apache2: Could not reliably determine the server’s fully qualified domain name, using 127.0.1.1. Set the ‘ServerName’ directive globally to suppress this message
Syntax OK
The error message is saying that there’s a symlink from sites-enabled but the actual file it points to is missing. So you’ll need to copy nextcloud-le-ssl.conf back into /etc/apache2/sites-available and make sure the other configuration files are there while you’re at it.
Then instead of manual symlinking, you can run sudo a2ensite nextcloud-le-ssl.conf to enable the config file in Apache, and don’t forget to sudo service apache2 restart
1 Like
Thanks linucksrox,
I did try to copy nextcloud-le-ssl.conf (which was in my Documents folder) back into /etc/apache2/sites-available in terminal. I changed directory to Documents and then used…
sudo cp nextcloud-le-ssl.conf /etc/apache2/sites-enabled
… but I got the error…
cp: not writing through dangling symlink ‘/etc/apache2/sites-enabled/nextcloud-le-ssl.conf’
Are you saying that nextcloud-le-ssl.conf in my Documents folder is a ‘short cut’ like in Windows ?
I gave up in the end and created new files in /etc/apache2/sites-enabled/ using…
sudo nano /etc/apache2/sites-enabled/nextcloud-le-ssl.conf
… which created an empty file. I then copied and pasted the text from nextcloud-le-ssl.conf in my Documents folder. I did the same with the nextcloud.conf file and it worked.
Now when I enter my IP address in a web browser, it redirects me to https (presumably because I have already set this up?) and I am able to create a new Nextcloud user name, password and data path.
Nextcloud is installed on my Ubuntu OS HDD and I tried to change the data path to a different drive. So on the web page I entered…
/media/general/Nextcloud
… where media/general is a different HDD I mounted and created the folder Nextcloud. But I get the error "Can’t create or write to the data directory media/general/Nextcloud
As /media/general/Nextcloud had root permissions, I changed the permissions to my Ubuntu username…
sudo chown -R username.username /media/Nextcloud
… but I still get the same error.
So what am I doing wrong now ?
Is it possible to have Nextcloud installed on one HDD and the data path point to a different HDD ?
So you are still trying to copy files directly into sites-enabled, although you should only be putting the files into sites-available?
I would recommend not doing it the way you did, and using the Apache recommended way instead.
Again here, the command you show does not match the path you referenced. Wouldn’t you want
sudo chown -R username:username /media/general/Nextcloud
You’ll want to make sure the drive you mounted is also partitioned and formatted (go with EXT4), and that you mount it as read/write instead of read only.
Yes you can definitely point the data path to a different hard drive (that’s what I used to do). You can also have the data directory on a network mount (now I do that on an NFS share from my FreeNAS).
Sorry my mistake, I did use…
sudo chown -R username:username /media/general/Nextcloud
When I use ‘ls -la’ from /media/general/ it shows…
drwxr-xr-x 2 username username 4096 Dec 21 21:08 Nextcloud
You are correct, I was trying to copy nextcloud-le-ssl.conf into /etc/apache2/sites-enabled instead of /etc/apache2/sites-available. Was this the reason I got the error…
cp: not writing through dangling symlink ‘/etc/apache2/sites-enabled/nextcloud-le-ssl.conf’
I have now deleted the files I created (nextcloud-le-ssl.conf and nextcloud.conf) from /etc/apache2/sites-available/ and used…
sudo cp nextcloud-le-ssl.conf /etc/apache2/sites-available
sudo cp nextcloud.conf /etc/apache2/sites-available
This time I didn’t get the error…
cp: not writing through dangling symlink ‘/etc/apache2/sites-enabled/nextcloud-le-ssl.conf’
I then restarted the apache server…
service apache2 restart
… and entered my IP address into my webserver.
But I still get the error "Can’t create or write to the data directory media/general/Nextcloud
Oops the user and group both need to be www-data so
sudo chown -R www-data:www-data /media/general/Nextcloud
It’s always good to use best practices when possible because a year from now if you need to make changes to Apache you might not remember that you set it up a non standard way and it can throw you off. 
1 Like
Thanks linucksrox, that fixed that problem
Now onto the next problem (will this ever end!!!)…
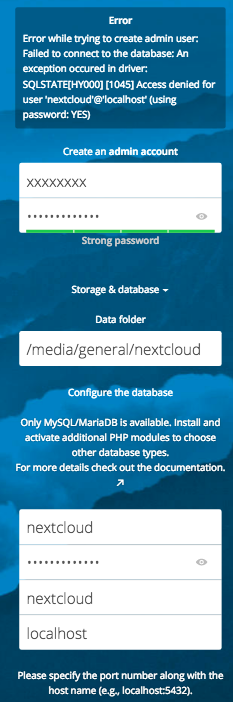
When I enter my IP address into a web browser (which is redirected to https) and I enter all the details I get the error
Error while trying to create admin user:
Failed to connect to the database: An exception occurred in the driver:
SQLSTATE[HY000][1045] Access denied for user nextcloud@localhost (using password YES)
I created the Mysql database as follows:
10 mysql –u root –p
11 CREATE DATABASE nextcloud;
12 GRANT ALL PRIVILEGES ON nextcloud.* TO ‘nextcloud’@‘localhost’ IDENTIFIED BY ‘{password}’;
13 FLUSH PRIVILEGES;
14 exit;
Are my following assumptions correct ?
-
For admin username and password I can use anything as this is only creating a new account ? I can use the same username and password that I used during my previous install ?
-
As shown in step 12 above, the database user is ‘nextcloud’ and the database name is ‘nextcloud’ and the password is the same as {password} ?
Not sure if it helps but below is my Nextcloud config.php…
$CONFIG = array (
‘instanceid’ => ‘xxxxxxxxxxxxxx’,
‘passwordsalt’ => ‘xxxxxxxxxx’,
‘secret’ => ‘xxxxxxxxxxxxxx’,
‘trusted_domains’ =>
array (
0 => ‘192.168.1.136’,
),
‘datadirectory’ => ‘/media/general/nextcloud’,
‘overwrite.cli.url’ => ‘https://192.168.1.136’,
‘dbtype’ => ‘mysql’,
‘version’ => ‘12.0.4.3’,
‘dbname’ => ‘nextcloud’,
‘dbhost’ => ‘localhost’,
‘dbport’ => ‘’,
‘dbtableprefix’ => ‘oc_’,
);
Is it missing dbuser and dbpassword (and if so why) ?
That should have done the trick. I always use the ‘root’@‘localhost’ user.
My syntax looks like
GRANT ALL PRIVILEGES ON DBNAME01.* TO ‘root’@‘localhost’ IDENTIFIED BY ‘******’;
the only difference i see is the ` around the DB name. Also check if the naming is correct for the DB name (case sensitive?)
can you logon to mysql with this user locally?
1 Like
Thanks Ascendancer
I did have syntax errors when I copied and pasted…
GRANT ALL PRIVILEGES ON nextcloud.* TO ‘nextcloud’@‘localhost’ IDENTIFIED BY ‘{password}’;
…due to the ` which seems to be auto corrected on my Mac !
How do I logon to mysql with the user locally ?
I can logon to mysql using my Ubuntu username and password using…
mysql –u root –p
Yes/Yes
That should be correct.
mysql -u nextcloud -p
Where -u specifies the username. The MySQL documentation says that GRANT was capable of creating the user if it didn’t already exist, but that functionality was deprecated in version 5.7.6 (https://dev.mysql.com/doc/refman/5.7/en/grant.html) Have you created the user first before doing the GRANT statement? If so, you can omit the last part IDENTIFIED BY ‘password’
Like Ascendancer said, you can just tell Nextcloud the root account credentials and be done with it, or you can get the nextcloud user working (that’s what I tend to do, because that way you can have more databases from other applications that won’t be able to interfere with each other, more of a security thing I guess.
Yes, either you succeed or you give up. You’re so close though!
2 Likes
Thanks once again linucksrox ![]() I owe you some beers !
I owe you some beers !
Yes, either you succeed or you give up. You’re so close though!
This is why I have created a 100 page power point presentation of my server setup, from Ubuntu installation to SSH, screen sharing, file sharing, media server etc ! I’ve recorded every single step as it has taken me a long time to setup so if I ever need to reinstall I now have a record of the procedure.
I tried to logon to mysql locally and I get the same error:
mysql -u nextcloud -p
Enter password:
ERROR 1045 (28000): Access denied for user ‘nextcloud’@‘localhost’ (using password: YES)
Im confused though because in the nextcloud installation procedure (in my post 26 above) I used ‘mysql –u root –p’…
10 mysql –u root –p
11 CREATE DATABASE nextcloud;
12 GRANT ALL PRIVILEGES ON nextcloud.* TO ‘nextcloud’@‘localhost’ IDENTIFIED BY ‘{password}’;
13 FLUSH PRIVILEGES;
14 exit;
In those instructions there was no step to create a user first before doing the GRANT statement ?
And I used the same procedure for my initial installation which worked fine, so I don’t understand why its not working this time around ?
I assume theres no point in manually adding dbuser and dbpassword to my Nextcloud config.php ?
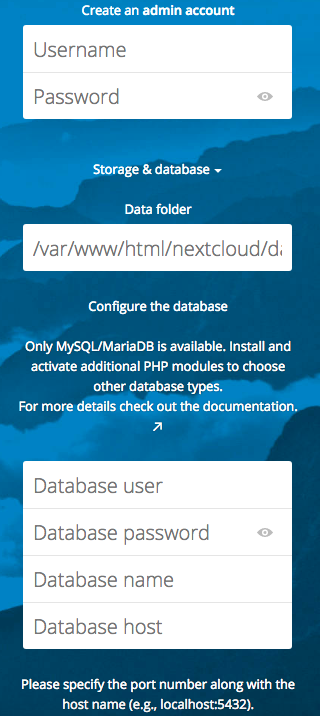
When you showed the nextcloud configuration page a few posts ago, it looks like you never told nextcloud to use mySQL. You need to expand the Storage & database selection and give it your information. That will add the dbuser and so forth to the config.php
Note that this won’t fix the issue with not being able to access the database, as that appears to be a different issue.
You are using the nextcloud password when you try mysql -u nextcloud -p, right?
If you can’t login to the mySQL nextcloud account, it is possible to change the password for that account by logging in as root and doing some SQL stuff.
2 Likes
Aha, Scott.Giles is right that you will need to specify that you’re using MySQL. No, manually adding the information into the config file probably won’t help.
Honestly I use phpmyadmin for managing MySQL stuff, so if you decide to install that I can help you through the permissions there.
Can’t say no to beer!
2 Likes
Did somebody say “Beer” ?
2 Likes
Thanks Scott
I finally got it working !
I ran this again…
GRANT ALL PRIVILEGES ON nextcloud.* TO ‘nextcloud’@‘localhost’ IDENTIFIED BY ‘{password}’;
…but this time I typed it in rather than copied and pasted (in case of syntax issues) and then I was able to to mysql with the user locally using…
mysql -u nextcloud -p
So I now appear to have Nextcloud up and running again with a different data path (it took a while after I entered all the credentials).
There doesn’t appear to be any steps to tell nextcloud to use mySQL in the Nextcloud installation procedure I followed ?
The Nextcloud installation procedure is from here…

The steps are in the comments below the video in the link (they are also copied and pasted in to my post 26 above).
When I add new HDDs I might have to change the data path so will have to do this all again, but I have kept a record of all the steps so hopefully it will be more straight forward next time !
Thanks again for everyone who responded and helped ![]()
1 Like