Since 2021 all images for the Raspberry Pi on GitHub are arm64 bit images. If you have set up your NCP before late 2020 you quite likely still run a armhf (32 bit) image.
- This wiki attempts to create a beginner-friendly ‘how-to’ to move from armhf to arm64.
- You are most welcome to contribute, by commenting and editing this wiki.
Why would you want arm64?
-
whole NC development focuses on 64bit so your 32bit NCP limits you in many ways and will do so increasingly.
-
However, before doing this you might want to consider abandoning your microSD all together and move to a boot from USB solution. There is a documentation over here . If you follow it you will also run NCP with a 64 bit image. However, there are some minor drawbacks to it.
If you wish to keep using the SD card, follow the steps below.
Outline
Starting Position:
- We are using a Raspberry Pi 4 (the pi 3b+ should also work but there are a number of issues holding you back, see this post
- We have an armhf (32bit) NCP instance set-up and want to keep its data without having to recover everything of it from a backup.
- All data (datadir) is on an external storage device (i.e. USB stick, USB Drive…)
- The Pi boots from the microSD
- We assume that the pi is set up headless, so we use ssh.
What we will do:
Install a new arm64 image on the SD card
Recover ncp settings, users and apps
Connect the new arm64 ncp instance back to the previously used data drive (no need to restore full backup)
Moving from armhf (32bit) to arm64
Preparation
-
Create a complete backup of your Nextcloud, to a separate drive (in case something goes wrong.)
-
Navigate to Export-NCP to create a backup for your NCP configurations. This is the backup we will want to use to restore the ncp configurations. Save it to:
/media/YOUR-BACKUP-DRIVE/It will be calledncp-config_XXXXXXXX.tar -
Navigate to
nc-backupto create adataless backup. This backup we will want to use to restore users and apps. Save it to:/media/YOUR-BACKUP-DRIVE/It will be callednextcloud_bkp_XXXXXXXX.tar
Installation
-
Download the latest NextcloudPi_RPi_XX-XX-XX.tar.bz2.
-
Unpack the
.tar.bz2file to get the.img -
Power off your Raspberry Pi
-
Remove the SD card with the 32bit image
-
Important: Disconnect any of your attached data drives!
-
Insert the new SD card with the arm64 image you just flashed
-
Connect the pi to power to boot.
-
Wait a few minutes and then access your Nextcloud by navigating to
https://nextcloudpi.localin your browser. )If this fails log into your router to see what the IP address is given to your Pi. As the MAC Address is still the same, and you probably have set up a static IP with your router, it should still have the same IP as before.) -
You should now see the NCP Activation page.
-
As you did when you set up your NCP the first time, note the two passwords (or use the Print button to make a .pdf of the page)
-
Hit
Activate -
After some time you should see the setup Wizard. Navigate to USB Configuration.
(THIS STEP MIGHT NOT BE NECESSARY - PLEASE FEEDBACK)-
Do you want to save Nextcloud data in a USB drive?
KlickYES -
Plug in your USB Data Drive you used previously.
Do not format your USB drive! That’s the point of it all, we want to avoid having to restore the full data backup. -
Klick:
skip(do not move data to USB, it might mess up things) -
Exit the Wizard.
-
Restore NCP Configurations
-
Enter the
web interface(admin panel) (https://nextcloudpi.local:4443) (or use the terminalncp-configif you prefer). -
On the left in section
Systemchoosenc-automountand activate it. -
Plug in your Bakup Drive
-
Login to your pi via SSH (ssh pi@IP-ADDRESS)
-
update the pi with
sudo apt update&sudo apt upgrade -
update ncp (if there is an update) by typing
sudo ncp-configand confirm. -
Type
df -hto list attached drives. -
You should see your formerly used data drive and your backup drive
-
Look for the name of your backup drive and type:
ls /media/BACKUP-DRIVE/ -
You should see a list of your backups.
-
Look for the config-backup and note its name:
ncp-config_XXXXXXXX.tar

- Go back to the NextcloudPi web pannel (at nextcloudpi.local)
- On the left in the section
Backupschoosenc-import-ncp - Fill in
path&file nameand hit apply. - This will not take long as it only restores your ncp settings. (You will not have any user or apps restored. This we will do in the following step.)

Restore Apps and User
- Follow step 5-9 from the description above.
- Look for the dataless backup file and note its name:
nextcloud-bkp_XXXXXXXX_XXXXXXXXXX.tar(if you do not know which one is the data less backup, type:ls -l /media/BACKUP-DRIVE/the-lwill let a extended list appear which shows you the size of the file. This way you should be able to see which one is smaller and therefore the dataless only) - Go back to the NextcloudPi web pannel (at nextcloudpi.local)
- On the left in the section
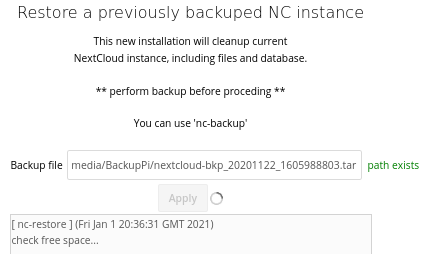
Backupschoosenc-restore - Fill in
path&file nameand hit apply. - As we only restore users and apps but not their data, this should not take very long.
- Once the backup has been restored successfully, reboot NCP using the web panel (top right) or reboot with SSH
sudo reboot now - Now you should be able to login with your former login, all your apps and users should be restored and the data on your USB media should be there as well.
Note:
- The web panel login will not be restored. you will have to use the password you got when you first activated (NCP activation page)
I have tested this myself and succeded. See post 23.
I would appreciate if you can give a brief feedback if you succeed or have issues. It helps to improve this wiki. Thanks!

